

- Open the python IDLE in Raspberry Pi and create a new Python file and enter the following code.
#This code has been published by Robu.in
#visit https://robu.in for more information

import sys

if(sys.version_info[0]<3):
  from Tkinter import *
else:
  from tkinter import *

import RPi.GPIO as pi
import math
#import tkSimpleDialog

class LED(Frame):
"""A Tkinter LED Widget.
a = LED(root,10)
a.set(True)
current_state = a.get()"""
OFF_STATE = 0
ON_STATE = 1

   def __init__(self,master,size=10,**kw):
      self.size = size
      Frame.__init__(self,master,width=size,height=size)
      self.configure(**kw)
      self.state = LED.OFF_STATE
      self.c = Canvas(self,width=self['width'],height=self['height'])
      self.c.grid()
      self.led = self._drawcircle((self.size/2)+1,(self.size/2)+1,(self.size-1)/2)
   def _drawcircle(self,x,y,rad):
       """Draws the circle initially"""
       color="red"
       return self.c.create_oval(x-rad,y-rad,x+rad,y+rad,width=rad/5,fill=color,outline='black')
   def _change_color(self):
       """Updates the LED colour"""
       if self.state == LED.ON_STATE:
          color="green"
       else:
          color="red"
       self.c.itemconfig(self.led, fill=color)
   def set(self,state):
       """Set the state of the LED to be True or False"""
       self.state = state
       self._change_color()
   def get(self):
       """Returns the current state of the LED"""
       return self.state

## Future Functionality
##class gpioEdit(tkSimpleDialog.Dialog):
## """Dialog to be expanded to support advanced gpio features like
## - Pull Up / Pull Down Resistor Config
## - Debounce"""
## def __init__(self, master,gpio):
## top = self.top = Toplevel(master)
## if gpio.isInput():
## title = "Edit Input: %s" %(str(gpio.name))
## else:
## title = "Edit Output: %s" %(str(gpio.name))
## l = Label(top,text=title)
## b = Button(top, text="Submit", command=self.submit)
##
## l.grid(row=0)
## b.grid(row=1)
##
## def submit(self):
## print("Submitted")
## self.top.destroy()

class GPIO(Frame):
   """Each GPIO class draws a Tkinter frame containing:
   - A Label to show the GPIO Port Name
   - A data direction spin box to select pin as input or output
   - A checkbox to set an output pin on or off
   - An LED widget to show the pin's current state
   - A Label to indicate the GPIOs current function"""
   gpio_modes = ("Passive","Input","Output")

   def __init__(self,parent,pin=0,name=None,**kw):
      self.pin = pin
      if name == None:
         self.name = "GPIO %02d" % (self.pin)
         Frame.__init__(self,parent,width=150,height=20,relief=SUNKEN,bd=1,padx=5,pady=5)
         ##Future capability
         ##self.bind('<Double-Button-1>', lambda e, s=self: self._configurePin(e.y))
         self.parent = parent
         self.configure(**kw)
         self.state = False
         self.cmdState = IntVar()
         self.Label = Label(self,text=self.name)
         self.mode_sel = Spinbox(self,values=self.gpio_modes,wrap=True,command=self.setMode)
         self.set_state = Checkbutton(self,text="High/Low",variable=self.cmdState,command=self.toggleCmdState)
         self.led = LED(self,20)
         self.Label.grid(column=0,row=0)
         self.mode_sel.grid(column=1,row=0)
         self.set_state.grid(column=2,row=0)
         self.current_mode = StringVar()
         self.led.grid(column=3,row=0)

         self.set_state.config(state=DISABLED)
         function = self.getPinFunctionName()
         if function not in ['Input','Output']:
            self.mode_sel.delete(0,'end')
            self.mode_sel.insert(0,function)
            self.mode_sel['state'] = DISABLED

## def _configurePin(self, y):
## """Future capability to setup pull up/down"""
## new = gpioEdit(self.parent,self)

    def isInput(self):
       """Returns True if the current pin is an input"""
       return (self.mode_sel.get() == "Input")

    def setMode(self):
        """Sets the GPIO port to be either an input or output
       Depending on the value in the spinbox"""
       if (self.mode_sel.get() == "Input"):
          self.set_state.config(state=DISABLED)
          pi.setup(self.pin,pi.IN)
       elif (self.mode_sel.get() == "Passive"):
          self.set_state.config(state=DISABLED)
          pi.cleanup(self.pin)
       else:
          self.set_state.config(state=NORMAL)
          pi.setup(self.pin,pi.OUT)
          self.updateInput()

    def getPinFunctionName(self):
        pin = self.pin
        functions = {pi.IN:'Input',
                     pi.OUT:'Output',
                     pi.I2C:'I2C',
                     pi.SPI:'SPI',
                     pi.HARD_PWM:'HARD_PWM',
                     pi.SERIAL:'Serial',
                     pi.UNKNOWN:'Unknown'}
        return functions[pi.gpio_function(pin)]

## Future Functionality
## def setPullUp(self,pullup):
## """Defines the GPIO as having a pull up resistor so the input
## state is inverted when read
## setPullUp(True) - Pin is pulled up
## setPullUP(False) - Pin is not pulled up"""
## self.pullup = pullup

   def toggleCmdState(self):
      """Reads the current state of the checkbox, updates LED widget
      and sets the gpio port state."""
      self.state = self.cmdState.get()
      self.updateLED()
      self.updatePin()

   def updatePin(self):
      """Sets the GPIO port state to the current state"""
      pi.output(self.pin,self.state)

   def updateLED(self):
      """Refreshes the LED widget depending on the current state"""
      self.led.set(self.state)

   def updateInput(self):
      """Updates the current state if the pin is an input and sets the LED"""
      if self.isInput():
         state = pi.input(self.pin)
         self.state = state
         self.updateLED()

class App(Frame):
   def __init__(self,parent=None, **kw):
      Frame.__init__(self,parent,**kw)
      self.parent = parent
      pi.setmode(pi.BCM)
      self.ports = []
     ## Get the RPI Hardware dependant list of GPIO
     gpio = self.getRPIVersionGPIO()
     for num,(p,r,c) in enumerate(gpio):
         self.ports.append(GPIO(self,pin=p))
         self.ports[-1].grid(row=r,column=c)
         self.update()

   def onClose(self):
       """This is used to run the Rpi.GPIO cleanup() method to return pins to be an input
       and then destory the app and its parent."""
       try:
           pi.cleanup()
       except RuntimeWarning as e:
           print(e)
           self.destroy()
           self.parent.destroy()

    def readStates(self):
        """Cycles through the assigned ports and updates them based on the GPIO input"""
        for port in self.ports:
            port.updateInput()

    def update(self):
        """Runs every 100ms to update the state of the GPIO inputs"""
        self.readStates()
        self._timer = self.after(100,self.update)
   def getRPIVersionGPIO(self):
       """Returns the GPIO hardware config for different Pi versions
       Currently supports layout 1 and 3"""
       gpio1 = ((0,0,0),
                (1,1,0),
                (4,2,0),
                (17,3,0),
                (21,4,0),
                (22,5,0),
                (10,6,0),
                (9,7,0),
                (11,8,0),
                (14,0,1),
                (15,1,1),
                (18,2,1),
                (23,3,1),
                (24,4,1),
                (25,5,1),
                (8,6,1),
                (7,7,1))
       gpio2 = ((2,0,0),
                (3,1,0),
                (4,2,0),
                (17,3,0),
                (27,4,0),
                (22,5,0),
                (10,6,0),
                (9,7,0),
                (11,8,0),
                (14,0,1),
                (15,1,1),
                (18,2,1),
                (23,3,1),
                (24,4,1),
                (25,5,1),
                (8,6,1),
                (7,7,1))
       gpio3 = ((2,0,0),
                (3,1,0),
                (4,2,0),
                (17,3,0),
                (27,4,0),
                (22,5,0),
                (10,6,0),
                (9,7,0),
                (11,8,0),
                (5,9,0),
                (6,10,0),
                (13,11,0),
                (19,12,0),
                (26,13,0),
                (14,0,1),
                (15,1,1),
                (18,2,1),
                (23,3,1),
                (24,4,1),
                (25,5,1),
                (8,6,1),
                (7,7,1),
                (12,8,1),
                (16,9,1),
                (20,10,1),
                (21,11,1))
   if pi.RPI_REVISION == 3:
      gpio = gpio3
      self.parent.title('Raspberry Pi GPIO - A+/B+/2B+')
   elif pi.RPI_REVISION == 2:
        #Change this when I know the pins on RPi GPIO Version 2
        gpio = gpio2
        self.parent.title('Raspberry Pi GPIO - A/B Rev2')
   elif pi.RPI_REVISION == 1:
        self.parent.title('Raspberry Pi GPIO - A/B')
        gpio = gpio1
   else:
        self.parent.title('Raspberry Pi GPIO - Unknown Version')
        ##Assume same config as A+/B+/2B+
        gpio = gpio3
        return gpio

def main():
    root = Tk()
    root.title("Raspberry Pi GPIO")
    a = App(root)
    a.grid()
    """When the window is closed, run the onClose function."""
    root.protocol("WM_DELETE_WINDOW",a.onClose)
    root.resizable(False,False)
   root.mainloop()

if __name__ == '__main__':
   main()
- Now save the program. We are saving it as gpio.py python file.
Step 2 - Running the program and Understanding the GUI panel
- Now open terminal and type command sudo python gpio.py to run the program.
- A panel window will open up like this -
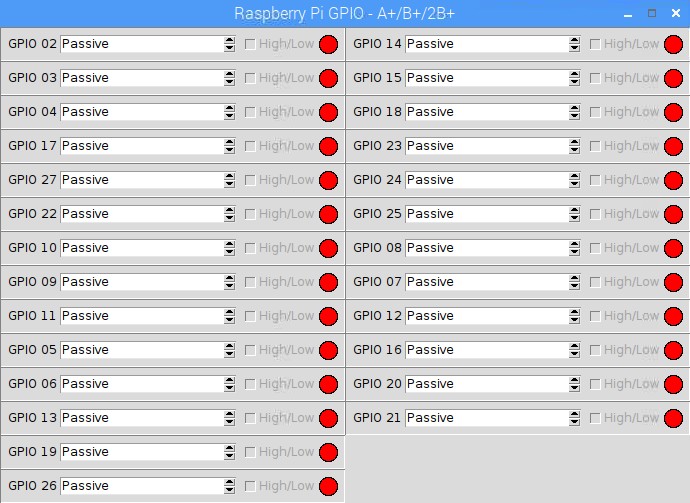
- From here you can set the status of any GPIO pin from the Corresponding drop down menu as Passive, Input or Output.
- If you have selected Output, then you will have to mark or unmark the corresponding High/Low box to make the Pin Low or High
- If you have selected Input, then the low Input will show the the Red colour and if input is high, it will show Green Colour.
")

")
")

Leave a Comment Your email address will not be published. Required fields are marked*