


 Sell on Robu


Hello, previously, we have seen the working of an ultrasonic sensor and its use in the real world. In this tutorial, we are looking at one of the most discussed topics, which is the relay module. After the completion of this topic, you will understand the interfacing of the 5v, 12v, 24v relay module with the Raspberry Pi GPIO and description on the sample python code for the relay module.
Basic Walkthrough
So, talking about the relay module, it is an electromagnetic switch and has a very famous history. You wouldn't believe, but in the early decades of communication-fields, relay modules were used to switch between the subscriber, but nowadays ultra-fast CPUs have taken their place.
The relay module requires less power to operate and is capable of switching high electrical devices. This feature of relay modules makes them the most preferable components. Other optional components are also available in the market, but when it comes to designing low-cost devices, every designer always favours relay modules.
In this tutorial, we are discussing the use of relay module with Raspberry Pi 4 and if you want to know more basics of relay module then you can follow this link. In that blog, I have explained in detail about each and everything. I hope you like it.
Components You Will Require
Interfacing Diagram Of The Relay Module With The Raspberry Pi GPIO
As you know that Raspberry Pi only generates 3.3v on GPIO pins, this means that you may not be able to power a 5v relay module using Raspberry Pi. The solution on this issue is the use of level converters, these level converters are nothing but MOSFETs that convert low-level signals 3.3V to 5V signals.
The following image shows interfacing of the relay module with the raspberry pi.
[caption id="attachment_732173" align="alignnone" width="956"]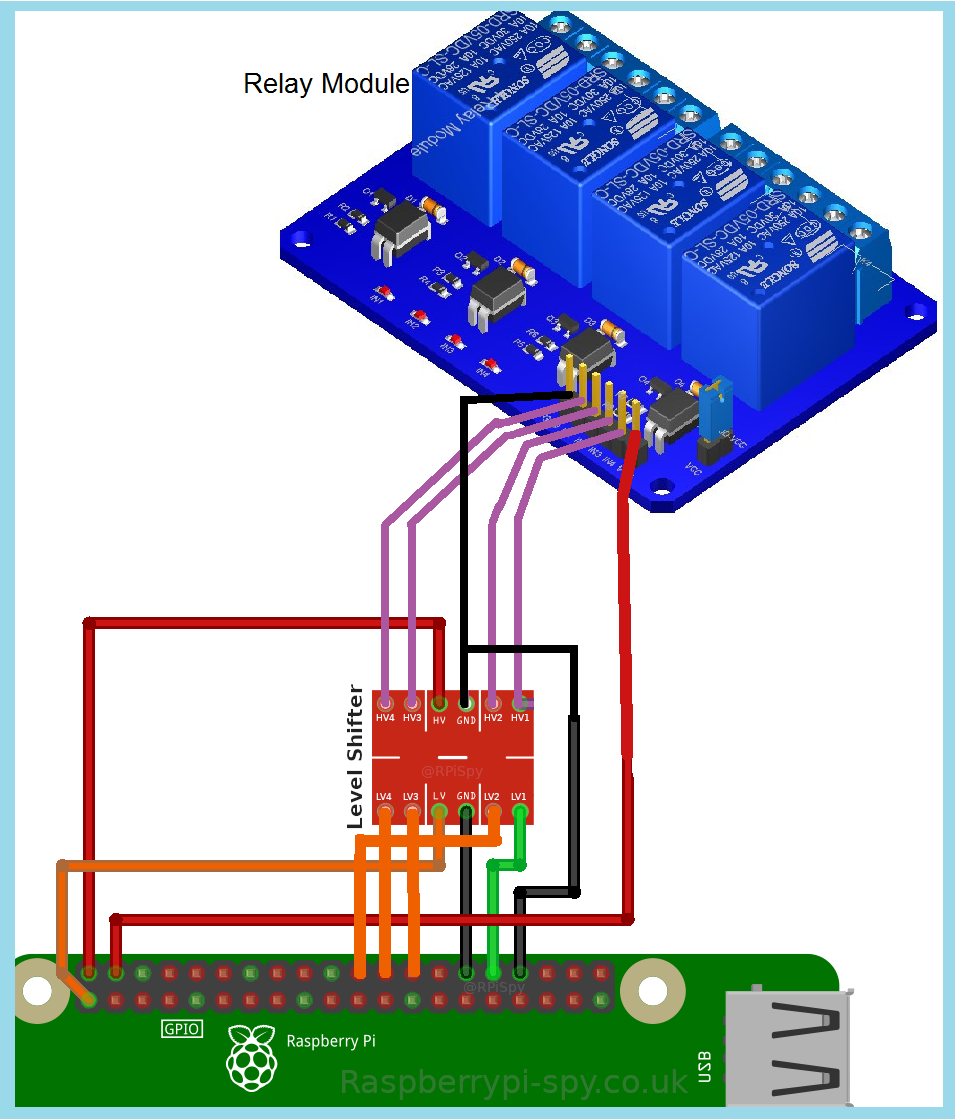 Interfacing Diagram[/caption]
The first thing in this code is to import the GPIO module and the time module, so let's do it. Here I have used the time module to add a delay between scripts.
import RPi.GPIO as GPIO
from time import sleep
Next, you should tell the board which numbering method you want to use. To know more about the numbering scheme, I request you to check the coding section of this blog. For this code, we are using the BCM numbering scheme.
GPIO.setmode(GPIO.BCM)
Next thing is pin initialization, as per the requirement of your application, you can initialize any GPIO pin but in this code, I have used the following pins.
Relay1_GPIO = 12

Relay2_GPIO = 7

Relay3_GPIO = 8

Relay4_GPIO = 25
Next, we will define the mode of the GPIO pin. In our case, we are powering an external device using the Raspberry Pi 4 GPIO. This means that we are outputting the value, so in this case, we will define the GPIO pin as the OUTPUT pin.
GPIO.output(Relay1_GPIO, GPIO.LOW)

sleep(1)

GPIO.output(Relay1_GPIO, GPIO.HIGH)

sleep(1)

GPIO.output(Relay1_GPIO, GPIO.LOW)

sleep(1)

GPIO.output(Relay1_GPIO, GPIO.HIGH)

sleep(1)

GPIO.output(Relay1_GPIO, GPIO.LOW)

sleep(1)

GPIO.output(Relay1_GPIO, GPIO.HIGH)

sleep(1)

GPIO.output(Relay1_GPIO, GPIO.LOW)

sleep(1)

GPIO.output(Relay1_GPIO, GPIO.HIGH)

sleep(1)
Conclusion
In this article, we learned about the interfacing of relay modules with Raspberry Pi 4 and Python code that you can use for communication with relay modules.
Check out the video for interfacing the relay module with a Raspberry Pi.
I hope you liked the article, if you have any suggestions, please let me know in the comments section.




Ron Spinabella
Friday, April 12, 2024