n the last article on AVR-USBASP, we have talk about how to use the USBasp to directly program the Arduino without Bootloader. Which mean there is no longer need the USB to serial circuit on the Arduino board. For this article, we will show you the simplest way to burn the Arduino Bootloader firmware to the ATMEGA328P microcontroller on Arduino Board. Please be noted that every Arduino Board comes with a microcontroller pre-program with Bootloader firmware. Therefore, there is no need to burn the bootloader firmware again if you are getting an Arduino Board.
Step 1: Get an AVR USBASP programmer
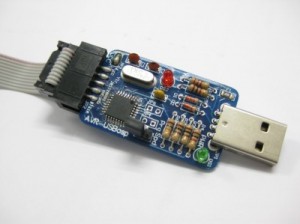
The USBasp programmer can be obtained from here.
Step 2: Connect the USBASP programmer to the Arduino Board
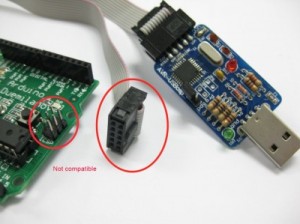
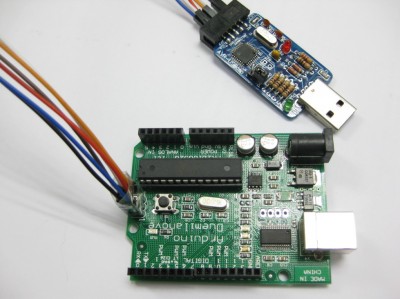
The socket from USBasp to ICSP connector on Arduino Board is not compatible. You can’t directly connect raibow cable to the Arduino Board.
 Therefore, you need to find a way to connect the USBasp to the Arduino board. In this case, female to female jumper wire is used. The jumpers is not included in the AVR USBASP. The connection is shown as in the photo above. For the detail connection, please refer to the AVR-USBASP User’s Manual which can be downloaded in the product page of AVR-USBASP.

If the ATMEGA microcontroller is used for the first time (fresh), the jumper wire on AVR-USBASP must be shorted as shown in the photo above. Else the communication may fail. It is due to the new fresh microcontroller are factory programmed for slow internal oscilator, thus we have to tell the USBASP programmer to program with slow speed. It is done by short the jumper wire above. It takes a longer time during the programming as it is programmed with slow speed. After the ATMEGA microcontroller is programmed for the first time, the mini jumper may disconnect (open) and the programming will be faster.
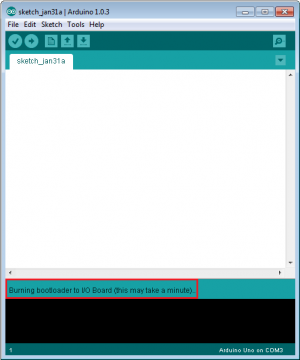
Step 3: Burning the bootloader, this may take few minutes
After connect the AVR-USBASP from your computer to the arduino board, open the arduino IDE and click on
Tools menu and under the
Programmer sub-menu select
USBasp.

Then, click on the
Burn Bootloader to start burning the bootloader under
Tools menu.

During the burning progress, the arduino software will display like photo above. If the jumper wire on the programmer is shorted, the programming process may take up to 5 minutes as it is in slow speed. So be patient!
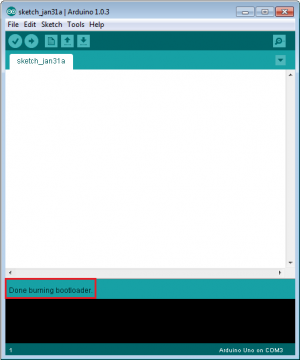
Arduino IDE will display “
Done burning bootloader” after it is done! That’s all!


 The USBasp programmer can be obtained from here.
Step 2: Connect the USBASP programmer to the Arduino Board
The USBasp programmer can be obtained from here.
Step 2: Connect the USBASP programmer to the Arduino Board
 The socket from USBasp to ICSP connector on Arduino Board is not compatible. You can’t directly connect raibow cable to the Arduino Board.
 Therefore, you need to find a way to connect the USBasp to the Arduino board. In this case, female to female jumper wire is used. The jumpers is not included in the AVR USBASP. The connection is shown as in the photo above. For the detail connection, please refer to the AVR-USBASP User’s Manual which can be downloaded in the product page of AVR-USBASP.
 If the ATMEGA microcontroller is used for the first time (fresh), the jumper wire on AVR-USBASP must be shorted as shown in the photo above. Else the communication may fail. It is due to the new fresh microcontroller are factory programmed for slow internal oscilator, thus we have to tell the USBASP programmer to program with slow speed. It is done by short the jumper wire above. It takes a longer time during the programming as it is programmed with slow speed. After the ATMEGA microcontroller is programmed for the first time, the mini jumper may disconnect (open) and the programming will be faster.
Step 3: Burning the bootloader, this may take few minutes
After connect the AVR-USBASP from your computer to the arduino board, open the arduino IDE and click onTools menu and under the Programmer sub-menu select USBasp.
If the ATMEGA microcontroller is used for the first time (fresh), the jumper wire on AVR-USBASP must be shorted as shown in the photo above. Else the communication may fail. It is due to the new fresh microcontroller are factory programmed for slow internal oscilator, thus we have to tell the USBASP programmer to program with slow speed. It is done by short the jumper wire above. It takes a longer time during the programming as it is programmed with slow speed. After the ATMEGA microcontroller is programmed for the first time, the mini jumper may disconnect (open) and the programming will be faster.
Step 3: Burning the bootloader, this may take few minutes
After connect the AVR-USBASP from your computer to the arduino board, open the arduino IDE and click onTools menu and under the Programmer sub-menu select USBasp.
 Then, click on the Burn Bootloader to start burning the bootloader under Tools menu.
 During the burning progress, the arduino software will display like photo above. If the jumper wire on the programmer is shorted, the programming process may take up to 5 minutes as it is in slow speed. So be patient!
 Arduino IDE will display “Done burning bootloader” after it is done! That’s all!

Leave a Comment Your email address will not be published. Required fields are marked*