


 Sell on Robu


Many times, when designing an embedded project you may need a serial monitor to check if all the things are working. But you do not think it is a time consuming and it can be stopped if we interface LCD with Arduino board. Yes, this is possible so let's get ready, in this blog we are going to learn how to interface a 16 x2 LCD display with an Arduino board.
Basics of LCD Display
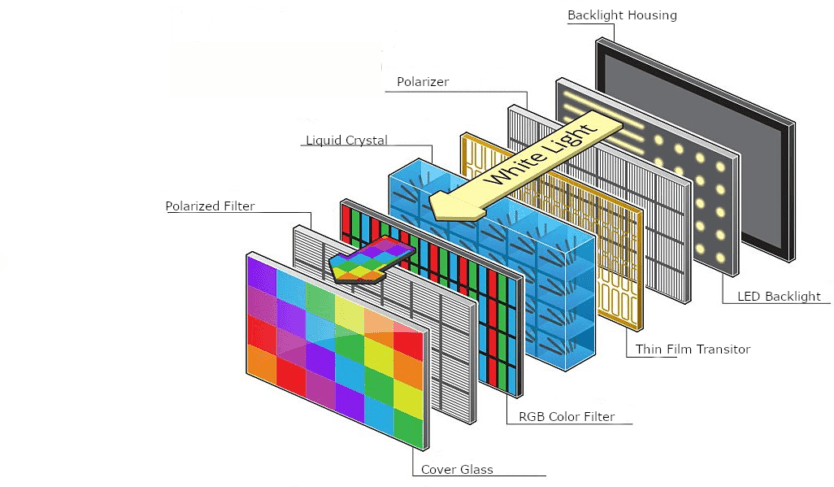
Basically, LCD is an abbreviation for liquid crystal display. It is named as an LCD because it uses liquid crystals to display an image. When a voltage is applied to these liquid crystals, these liquid crystals disintegrate and let the backlight pass through them.
Why Use The LCD In The Arduino Project?
When designing an embedded system, each process of the system requires continuous monitoring until the process is finished, in such cases, we should use an LCD in our project. Using the LCD in the project brings the project to life for the user and helps him with the appropriate information he is seeking.
The most commonly used system in which we see LCD the most is the coffee making machine. The LCD on the coffee grinder displays the amount of coffee available in the machine.
Apart from this, it also helps the user to choose the preferred option.
If we check in the market then different types of displays are also available in the market like seven-segment display, TFT LCD, OLED and more. But if we compare the price-wise then using 16 * 2 LCD is the cheapest option.
Pinout Details of 16 * 2 LCD Display
VCC and GND
The LCD display powered through the Arduino with the help of these pins.
VEE
The brightness of the LCD display can be adjusted using this pin.
LED +, LED-
These pins used to power the LCD display's backlight and should be connected to VCC and GND pin of the Arduino.
RS (Register Select)
The LCD consists of two registers, a data register and a command register. These are special-purpose registers.
If we make this pin HIGH and put the data on the data line then that data is accepted as the data to be displayed by the LCD. If we make this pin LOW then that data is accepted as a command to the LCD.
R/W
R/W pin is an active-high pin when the input on this pin is low, the LCD performs in a write operation. If the input is high, the LCD performs the read operation
DB0- DB7
Data or commands are given to the LCD display through these pins.
EN (Enable)
As the name itself suggests, This pin enables the LCD module.
Interfacing LCD with Arduino
The Following components You will need to interface the LCD with Arduino
- Hardware Parts
2. Software Parts
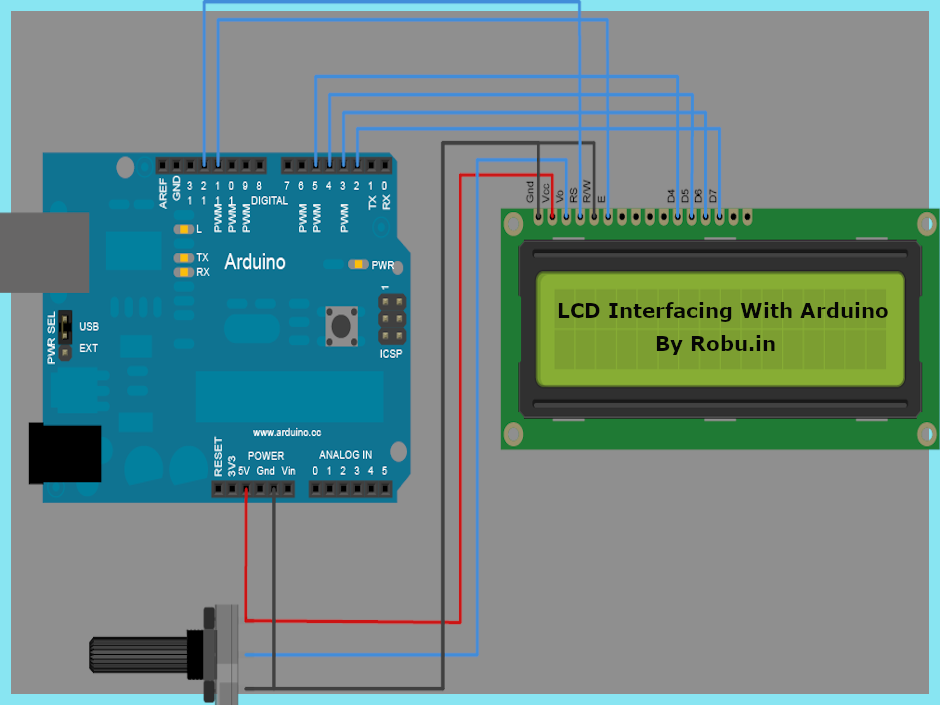
The following image shows the interfacing diagram of the LCD with the Arduino board. In this diagram, we are powering the LCD display through the Arduino.
The VEE pin is connected to the output of the potentiometer and using the potentiometer we are adjusting the contrast of the display but if you do not have a potentiometer you can connect this VEE pin directly to the 3.3 pin of the Arduino board.
The LED- and LED + pins are connected to the GND and VCC pins of the Arduino and the data pins DB4, DB5, DB6 and DB7 are connected to the Arduino board of digital pins 5, 4, 3 and 2.
RS and E are interfered with D11 and D12, while R / W pins are connected to GND pins to enable write mode.
LCD Arduino Code
#include<LiquidCrystal.h>

LiquidCrystal lcd(12, 11, 5, 4, 3, 2);  // sets the interfacing pins

void setup()
{
  lcd.begin(16, 2);  // initializes the 16x2 LCD
  lcd.setCursor(0,0);           //sets the cursor at row 0 column 0
  lcd.print("LCD Tutorial"); // prints LCD Tutorial
  lcd.setCursor(5,1);           //sets the cursor at row 1 column 5
  lcd.print("HELLO WORLD");     // prints Robu.in
}

void loop()
{
  // Your Code
}
In this code, we are using the liquid crystal library, this library is easy to use and easy to understand. Here I have mentioned some methods which will help you in this project.
#include LiquidCrystal.hThis line of code initializes the library and makes the LiquidCrystal library available for the entire code.
lcd.begin()This line of code initiates communication between the LCD and the Arduino. It also tells the Arduino the dimensions of the LCD.
lcd.print()Using the above line of code, you can print letters on the screen.
lcd.setCursor()To adjust the cursor on the screen. Where can you use this function? Suppose you do not want to start printing characters from the first position. In that case, you can use this method to skip the first position and start printing from the required position.
For more understanding of this library, we request you to check the documentation of this library.
Displaying scrolling text on 16×2 LCD with Arduino
By making use of above code you will be able to print the text on the screen but what if you want to scroll whatever you will print on the screen? Is it possible using this library? And the answer to this question is yes. You can use the following code to scroll the characters on the LCD display.
Code For Scrolling the letters
#include <LiquidCrystal.h>
int speed=0;

LiquidCrystal lcd(12, 11, 5, 4, 3, 2);

void setup()
{
 lcd.begin(16, 2);                              //initializes 16x2 LCD
 lcd.setCursor(0,1)
 lcd.print("Tutorial by Robu.in");   //Scrolling Text

}

void loop()
{
  for(speed=0; speed<2; speed++)
  {
lcd.scrollDisplayRight();    //scrolls display right by two positions
  }
  delay(500);              //sets the speed at which display moves Please addjust this value if cant see letters clearly.
}
Conclusion
In this blog, we have discussed the basics of LCD modules, how to print characters on an LCD module, use of the lcd.print () function, and learned how to scroll through text on an LCD.
I hope you liked my presentation, if you have any questions, please let us know in the comments section and we will answer them for sure.



Leave a Comment Your email address will not be published. Required fields are marked*