


 Sell on Robu


Nowadays, fingerprint sensors play a vital role in security systems and at access points. Fingerprint application has existed for the identification purpose. Every person has a unique fingerprint, so it is the best way to identify an accessible person for a system.
The fingerprint is classified into five types whorl, right loop, left loop, tented, and arch. Features of the fingerprint recognition system are faster speed, lower cost. Also, consistency is more significant than other systems.
In this tutorial, we are going to interface this R307 fingerprint sensor with the Arduino. We are going to make an Arduino-based fingerprint scanner system.
How does a Fingerprint Sensor work?
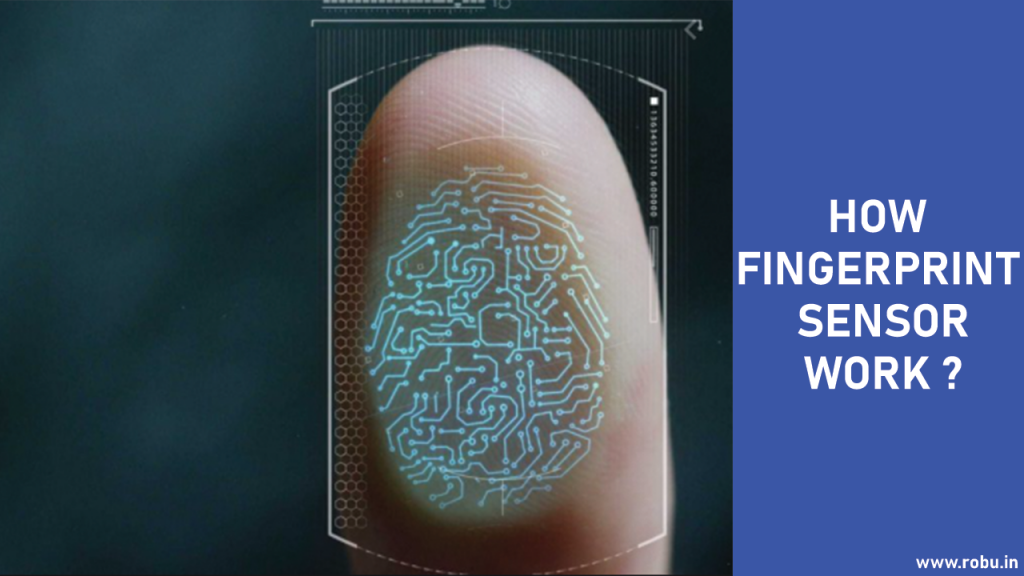
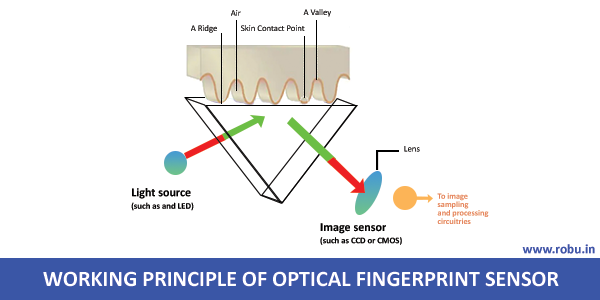
Generally, the fingerprint scanner works by using optical rays. There are two types of fingerprint sensors, the optical one and the capacitive one. The optical fingerprint will flash a bright light to the finger. Also, it captures the image of the finger digitally.
Then it observes the finger pattern, turns this pattern into logic 0 or 1, and creates the source code for that fingerprint. This source code is the identification key of the fingerprint. If it matches, then and then the access will be granted by the sensor to a system.
A capacitive array circuit tracks every detail of the finger in the capacitive type of scanner. It uses the ridges of the fingerprint placed over the conductive plates, which change the charge stored in the capacitor, while the valleys leave the charge on the capacitor unchanged.
Then there is an operational amplifier circuit, which keeps track of every little detail of the fingerprint. This data is then recorded by using an analog to digital converter. Also, it gets analyzed by the ADC converter.
What is R307 Optical Fingerprint Scanner?
This fingerprint scanner involves two processes one is fingerprint enrollment, and another one is fingerprint matching. For this R307 scanner, each module has to identify the address.
When this module communicates with the system, each data source is transferred in the data package form containing the address item. The scanner responds to only that data package whose value matches the address value of the scanner.
When R307 communicates with the system, its protocol and instruction set apply for USB and UART communication modes. For Personal Computers, the USB mode is strongly recommended to get faster data exchanging speed for the fingerprint scanner.
Features of the fingerprint sensor
- The R307 fingerprint sensor includes image collection as well as a chip algorithm.
- Low power consumption, easy to use.
- Excellent performance, small in size, cost-effective.
- High-capacity image processing with high resolution.
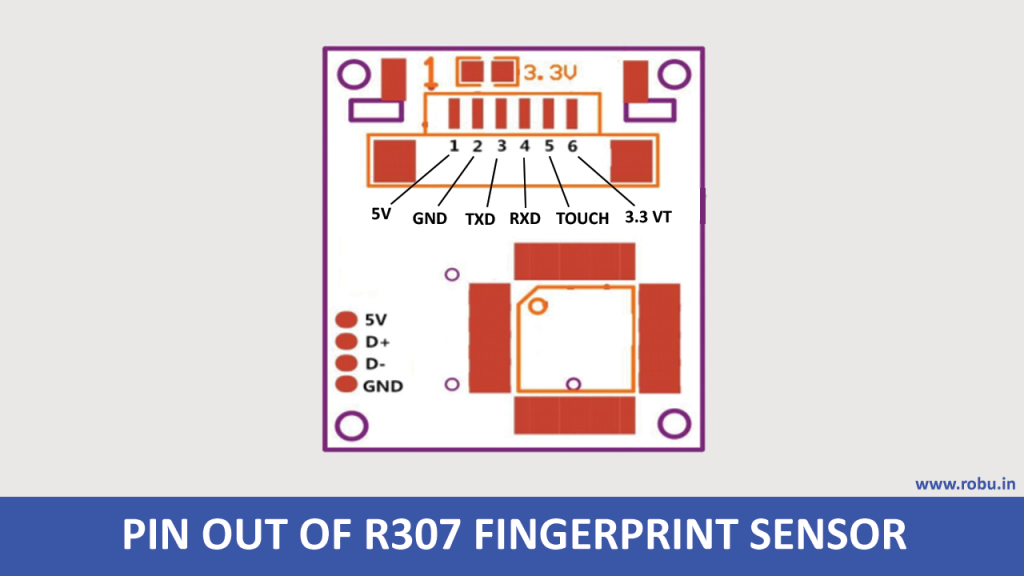
Pinout of the R307 fingerprint scanner
| Pin number | Name | Type | Function/Description of pin |
| 1 | 5V | Input | Power input |
| 2 | GND | _ | Signal ground |
| 3 | TXD | Output | Data output. TTL logical level |
| 4 | RXD | Input | Data input. TTL logical level |
| 5 | Touch | Output | Finger detection signal |
| 6 | 3.3V | Input | Finger detection power |
Components Required
Interfacing R307 with Arduino
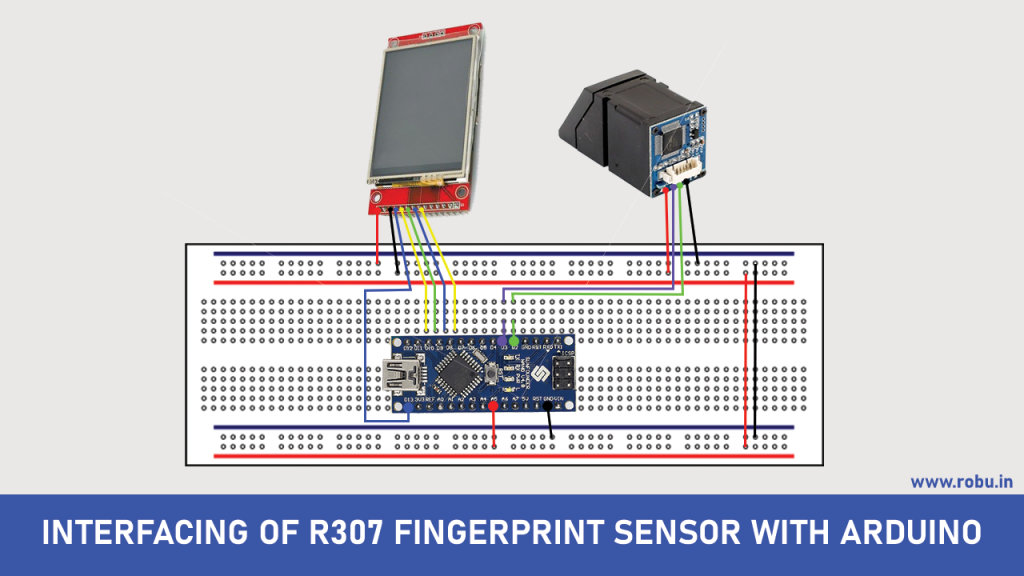
Now let us connect the sensor and the display with Arduino as given below.
- Fingerprint Sensor Connections
- Black Wire > Arduino GND
- Red Wire > Arduino 5V
- Green Wire > Digital Pin 2
- White Wire > Digital Pin 3
- Display Connections
- Vcc > 5V pin of the Arduino
- GND > Arduino GND pin
- CS > Digital Pin 10
- RST > Digital Pin 9
- A0 > Digital Pin 8
- SDA > Digital Pin 11
- SCK > Digital Pin 13
- LED > 3.3V pin of the Arduino
Installing Libraries for the Fingerprint scanner and the display
Now let's install the necessary libraries for the fingerprint scanner and the display as well. Firstly we need to download the Adafruit library for fingerprint scanner, which is the Adafruit GFX library. Secondly, we have to download Sumotoy's library for the display. Following are the links for the libraries. Click on the link and add them to the system.
- https://github.com/adafruit/Adafruit-Fingerprint-Sensor-Library
- https://github.com/adafruit/Adafruit-GFX-Library
- https://github.com/sumotoy/TFT_ILI9163C
After successfully adding libraries to the system, open the Arduino software. We have to upload the code to our Arduino board. For this, we go to the File > Examples > Adafruit Fingerprint Sensor Library > Enrol. Here we will find the example code.
This code will ask us to enrol the fingerprint after uploading it to the Arduino. By doing this, we can add as many fingerprints as we want to add. Every fingerprint will have a separate ID for identification.
Code
After registering the fingerprint to the fingerprint sensor successfully, upload the below code to the Arduino to show this process on display.
   //////////////////////////////////////////////////////////////////
  //         Arduino Fingerprint Sensor Tutorial                  //
 //       Get the latest version of the code here:               //
//                                                              //
/////////////////////////////////////////////////////////////////


#include <SPI.h>
#include <Adafruit_GFX.h>
#include <TFT_ILI9163C.h>
#include <Adafruit_Fingerprint.h>
#include <SoftwareSerial.h>

// Color definitions
#define BLACK   0x0000
#define BLUE    0x001F
#define RED     0xF800
#define GREEN   0x07E0
#define CYAN    0x07FF
#define MAGENTA 0xF81F
#define YELLOW  0xFFE0
#define WHITE   0xFFFF

#define __CS 10
#define __DC 9
static const uint8_t icon [] PROGMEM = {
0x0,0x0,0x0,0x0,0x0,0x0,0x0,0x0,
0x0,0x0,0x0,0x0,0x0,0x0,0x0,0x0,
0x0,0x0,0x0,0x0,0x0,0x0,0x0,0x0,
0x0,0x0,0x0,0x3f,0xc0,0x0,0x0,0x0,
0x0,0x0,0x3,0xff,0xf8,0x0,0x0,0x0,
0x0,0x0,0x7,0xff,0xfe,0x0,0x0,0x0,
0x0,0x0,0x1f,0xc0,0x7f,0x80,0x0,0x0,
0x0,0x0,0x3e,0x0,0x7,0xc0,0x0,0x0,
0x0,0x0,0x7c,0x0,0x3,0xe0,0x0,0x0,
0x0,0x0,0xfd,0xff,0x81,0xf0,0x0,0x0,
0x0,0x0,0xff,0xff,0xe0,0xf0,0x0,0x0,
0x0,0x1,0xff,0xff,0xf8,0x78,0x0,0x0,
0x0,0x1,0xff,0x80,0x7c,0x38,0x0,0x0,
0x0,0x3,0xfc,0x0,0xe,0x3c,0x0,0x0,
0x0,0x3,0xf0,0x0,0x7,0x1c,0x0,0x0,
0x0,0x7,0xc0,0x7f,0x83,0x8e,0x0,0x0,
0x0,0x7,0x83,0xff,0xe0,0xe,0x0,0x0,
0x0,0x7,0xf,0xff,0xf8,0xf,0x0,0x0,
0x0,0x6,0x1f,0x80,0xfc,0x7,0x0,0x0,
0x0,0x4,0x7e,0x0,0x3f,0x7,0x0,0x0,
0x0,0x0,0xf8,0x0,0xf,0x7,0x0,0x0,
0x0,0x0,0xf0,0x3e,0x7,0x87,0x0,0x0,
0x0,0x1,0xe1,0xff,0x83,0x83,0x80,0x0,
0x0,0x3,0xc3,0xff,0xc3,0xc3,0x80,0x0,
0x0,0x3,0xc7,0xc3,0xe1,0xc3,0x80,0x0,
0x0,0x3,0x8f,0x0,0xf1,0xe3,0x80,0x0,
0x0,0x7,0x1e,0x0,0x78,0xe3,0x80,0x0,
0x0,0x7,0x1e,0x3c,0x38,0xe3,0x80,0x0,
0x0,0x7,0x1c,0x7e,0x38,0xe3,0x80,0x0,
0x0,0xf,0x1c,0x7f,0x38,0xe3,0x80,0x0,
0x0,0xe,0x3c,0xf7,0x38,0x71,0x80,0x0,
0x0,0xe,0x38,0xe7,0x38,0x71,0xc0,0x0,
0x0,0xe,0x38,0xe7,0x38,0x71,0xc0,0x0,
0x0,0xe,0x38,0xe7,0x38,0x73,0xc0,0x0,
0x0,0xe,0x38,0xe3,0x98,0xe3,0xc0,0x0,
0x0,0xe,0x38,0xe3,0xb8,0xe3,0x80,0x0,
0x0,0x0,0x38,0xe3,0xf8,0xe3,0x80,0x0,
0x0,0x0,0x38,0xe3,0xf8,0xe3,0x80,0x0,
0x0,0x0,0x3c,0xf1,0xf1,0xe3,0x80,0x0,
0x0,0x6,0x1c,0x70,0x1,0xc7,0x80,0x0,
0x0,0xe,0x1c,0x78,0x3,0xc7,0x80,0x0,
0x0,0xf,0x1c,0x3e,0x7,0x87,0x0,0x0,
0x0,0xf,0x1e,0x3f,0xff,0x8f,0x0,0x0,
0x0,0xf,0x1e,0x1f,0xff,0x1f,0x0,0x0,
0x0,0xf,0xf,0x7,0xfc,0x3e,0x0,0x0,
0x0,0x7,0x87,0x80,0x0,0x7c,0x0,0x0,
0x0,0x7,0x87,0xe0,0x0,0xfc,0x0,0x0,
0x0,0x3,0xc3,0xf8,0x7,0xf8,0x0,0x0,
0x0,0x3,0xe1,0xff,0xff,0xe1,0x0,0x0,
0x0,0x1,0xe0,0x7f,0xff,0x83,0x0,0x0,
0x0,0x1,0xf8,0xf,0xfe,0x7,0x0,0x0,
0x0,0x0,0xfc,0x0,0x0,0xe,0x0,0x0,
0x0,0x0,0x3f,0x0,0x0,0x3c,0x0,0x0,
0x0,0x0,0x1f,0xe0,0x1,0xf8,0x0,0x0,
0x0,0x0,0x7,0xff,0xff,0xf0,0x0,0x0,
0x0,0x0,0x1,0xff,0xff,0xc0,0x0,0x0,
0x0,0x0,0x0,0x1f,0xfc,0x0,0x0,0x0,
0x0,0x0,0x0,0x0,0x0,0x0,0x0,0x0,
0x0,0x0,0x0,0x0,0x0,0x0,0x0,0x0,
0x0,0x0,0x0,0x0,0x0,0x0,0x0,0x0
};


TFT_ILI9163C display = TFT_ILI9163C(__CS,8, __DC);
SoftwareSerial mySerial(2, 3);
Adafruit_Fingerprint finger = Adafruit_Fingerprint(&mySerial);
int fingerprintID = 0;

void setup(void) {

  startFingerprintSensor();
  display.begin();
  displayLockScreen();
}

void loop() {

  fingerprintID = getFingerprintID();
  delay(50);
  if(fingerprintID == 1)
  {
    display.drawBitmap(30,35,icon,60,60,GREEN);
    delay(2000);
    displayUnlockedScreen();
    displayIoanna();
    delay(5000);
    display.fillScreen(BLACK);
    displayLockScreen();
  }

   if(fingerprintID == 2)
  {
    display.drawBitmap(30,35,icon,60,60,GREEN);
    delay(2000);
    displayUnlockedScreen();
    displayNick();
    delay(5000);
    display.fillScreen(BLACK);
    displayLockScreen();
  }
}


void displayUnlockedScreen()
{
   display.fillScreen(BLACK);
   display.drawRect(0,0,128,128,WHITE);

   display.setCursor(18,10);
   display.setTextColor(GREEN);
   display.setTextSize(2);
   display.print("UNLOCKED");

   display.setCursor(20,50);
   display.setTextColor(WHITE);
   display.setTextSize(2);
   display.print("WELCOME");
}
void displayNick()
{
  display.setCursor(35,75);
  display.setTextColor(WHITE);
  display.setTextSize(2);
  display.print("NICK!");
}

void displayIoanna()
{
  display.setCursor(25,75);
  display.setTextColor(WHITE);
  display.setTextSize(2);
  display.print("IOANNA!");
}

void displayLockScreen()
{
  display.drawRect(0,0,128,128,WHITE);
  display.setCursor(30,10);
  display.setTextColor(RED);
  display.setTextSize(2);
  display.print("LOCKED");

  display.setCursor(10,100);
  display.setTextColor(WHITE);
  display.setTextSize(1);
  display.print("Waiting for valid \n    fingerprint.");

  display.drawBitmap(30,35,icon,60,60,WHITE);
}
void startFingerprintSensor()
{
  Serial.begin(9600);
  finger.begin(57600);

  if (finger.verifyPassword()) {
    Serial.println("Found fingerprint sensor!");
  } else {
    Serial.println("Did not find fingerprint sensor");
  }
  Serial.println("Waiting for valid finger...");
}

int getFingerprintID() {
  uint8_t p = finger.getImage();
  if (p != FINGERPRINT_OK)  return -1;

  p = finger.image2Tz();
  if (p != FINGERPRINT_OK)  return -1;

  p = finger.fingerFastSearch();
  if (p != FINGERPRINT_OK)  return -1;

  // found a match!
  Serial.print("Found ID #"); Serial.print(finger.fingerID);
  Serial.print(" with confidence of "); Serial.println(finger.confidence);
  return finger.fingerID;
}
Final Words
Thanks For being here till the end. I hope all your doubts and concepts about the fingerprint scanner got cleared. If you like this article or have any suggestions, please let me know in the comment section.



Leave a Comment Your email address will not be published. Required fields are marked*