Skip to navigation Skip to content
  • 1800 266 6123
  •  [email protected]
  • My Orders
  • Track your order
  • My Account
    • My Account
    • My Cart
    • Checkout
Robu.in | Indian Online Store | RC Hobby | Robotics
  • Shop by Brands
  • New Arrivals
  • Electronic Components
    • Basic Electronic Components
      • Component Kit
      • Resistor
      • Inductor
      • Capacitor
      • Diode
      • Transistor
      • Crystal Oscillators
    • Semiconductor ICs
      • Microcontroller ICs
      • Interface ICs
      • Clock, Timer and Counter ICs
      • Sensor ICs
      • Optocoupler ICs
      • Converter ICs
      • Comparator ICs
      • Driver ICs
      • Encoder ICs
      • Audio ICs
      • IC Base
    • LEDs and Indicators
      • LEDs Kit
      • Pilot Lamp Indicator
      • LEDs with Holders
      • Through Hole LED
      • SMD LED
    • Miscellaneous Component
      • Potentiometer
      • Fuse
      • Buzzer/Speaker
      • Aluminium Heat Sink
      • Bread Board and Zero PCB
    • Mechanical Switches
    • Power Connectors
    • RF Connectors
    • Interface Connector
    • Berg / FPC / IDC Connector
  • DIY Learning and Robot Kits
    • Orange Premium Learning Kits
      • Orange Kits for Arduinos
      • Orange Kits for Raspberry Pi
      • Orange Electronic Component Kits
      • Orange DIY Mini Project Kits
    • DIY Hobby Project Parts
    • Robot Kits and Parts
    • Drone Kit
    • DIY 3D Printer Kits
    • Ebike Kit
    • Official Raspberry Pi Kits
    • Kits compatible with Arduino
    • Sensor Kits
    • Component Kit
  • Drone Parts
    • Kits
    • Frames and Accessories
    • Flight Controller & Accessories
    • Motors
    • Speed Controllers (ESC)
    • Propellers
      • Upto 3 Inch
      • 3 Inch to 7 Inch
      • 8 Inch to 10 Inch
      • 11 Inch and Above
      • Carbon Fiber Propeller
      • Triblades
      • Propeller Accessories
    • Drone Transmitter & Receiver
    • Antennas
    • FPV Cameras
    • FPV Antennas and Trans-Receivers
    • Accessories
    • Camera Gimbal
  • E-Bike Parts
    • Ebike Kit
    • Ebike Motor and Controller
    • Ebike Battery
    • Mechanical Accessories
    • Electronics Accessories
  • 3D Printers and Parts
    • Creality 3D Printers
    • Electronics Parts
      • 3D Printer Display and Controllers
      • 3D Printer Extruder Kit
      • 3D Printer Extruder Parts and Fans
      • Stepper Motors and Accessories
      • 3D Printer Display and Controller
      • Limit Switch
    • Mechnical Parts
      • 3D Printer Heatbed and Accessories
      • 3D Printer Nozzle
      • Lead Screw and Nut
      • Linear Guide Rail
      • Aluminum Extrusion and Accessories
      • Smooth Rods
      • 3D Printer Couplings
      • Timing Belt and Pulley
      • Sleeves and Drag Chain
    • 3D Printer Filaments
      • ORANGE Premium Filaments
      • ESUN Filaments
      • Resins
  • Batteries, Chargers and Accessories
    • Custom Battery Pack
    • Lemon Premium Li-PO Battery
      • 2S Lipo (7.4V ~ 8.4V)
      • 3S Lipo (11.1V ~ 12.6V)
      • 4S Lipo (14.8V ~ 16.8V)
      • 6S LiPo (22.2V ~ 25.2V)
    • Orange LiPO Battery
      • 1 Cell (3.7-4.2)V
      • 2 Cell (7.4-8.4)V
      • 3 Cell (11.1-12.6)V
      • 4 Cell (14.8-16.8)V
      • 6 Cell (22.2-25.2)V
    • Micro LiPo Batteries
    • Lithium-Ion Batteries
      • 1 cell (3.7V~4.2V)
      • 2 Cell (7.4V~8.4V)
      • 3 Cell (11.1V~12.6V)
      • 4 Cell (14.8V~16.8V)
      • 5 Cell (18.5V) & Above
    • Orange Premium BMS
    • Other Batteries
      • TX/RX Li-PO Batteries
      • LifePO4 Battery
      • Coin Cell Battery
      • CNC and PLC Machine Battery
    • Battery Accessories
      • Battery Protection Board
      • Battery Pack Accessories & Holders
      • Battery Chargers
      • Battery Connector
      • Battery Harness
      • Power Adapter and Cable
      • Lipo Voltage Checker
      • Parallel Charging Board
      • LiPO Battery Sack, Covers & Mats
  • Motors, Drivers, Actuators
    • Planetary Gear Motor
      • Orange Planetary Gears Motor
      • Orange Planetary BLDC Motors
      • Planetary Gear DC Motors
    • Brushed DC Motor
      • Orange Johnson Geared Motor
      • Johnson Geared Motor (Grade B)
      • DC Geared Motor with Encoder
      • 25 GA Motors
      • Orange OG 555 DC Motor
      • RS 50 Geared Motor
      • Orange RS 775 DC Motor
      • Orange PM33 Motor
      • Orange Square Gear Box Motor
      • Orange Rectangular Gearbox Motor
    • N20 Micro Gear Motor
      • Micro Gear Motor with Encoder
      • Micro Gear Motor without Encoder
    • Stepper Motor
    • Servo Motors
      • Orange RC Servo Motors
      • Emax Servo Motor
      • Other Servo motor
    • Pumps
    • Cooling Fans
    • Linear Motor/Actuator
    • Solenoids & Electromagnets
    • Other DC Motors
      • BO Motors
      • Metal Gear Box Motor
      • Plastic Gear Box Motors
      • Vibration Motor
      • Drone Motor
    • Motor Drivers
      • Brushed DC Motor Driver
      • Servo Motor Driver
      • Stepper Motor Drivers
      • Brushless DC Motor Driver (ESC)
    • Motor Accessories
      • Motor Mounting Brackets
      • Bearings
      • Couplings
      • JR Servo Cable
      • Futaba Servo Cable
      • Push Rod
      • Other Accessories
  • Development Board
    • Official Arduino Boards
      • Original Arduino Boards
      • Official Arduino Shields
      • Official Arduino Kits
    • Raspberry Pi
    • 8051 Board
    • Single Board Computer
    • Teensy Board
    • Udoo Board
    • ARM Microcontroller
    • PIC Development board
    • Programmers
    • Advance Development Boards
    • Compatible with Arduino Boards
      • Boards
      • Shields
      • USB Cables for Arduino
      • Displays
      • Case for Arduino
  • Official Arduino Boards
    • Original Arduino Boards
    • Official Arduino Shields
    • Official Arduino Kits
  • Raspberry Pi
    • Official Boards and Hats
    • Official Accessories
    • Kits
    • Raspberry Pi Case
    • Display
    • Camera
    • Raspberry Pi Hats
    • Accessories
  • Displays
    • HMI LCD Display
    • LCD Displays
    • OLED Display
    • e-Ink Display
    • Seven Segment LED Display
    • LED Dot Matrix Display
  • Sensors
    • Sensor Kits
    • Ultrasonic and Proximity
      • MAXBOTIX Ultrasonic Sonar
      • Ultrasonic Sensor
      • Orange Proximity Sensor
      • Autonics Proximity Sensor
      • Other Proximity Sensor & Modules
      • LiDAR Sensor
      • Other Ultrasonic Sensors
    • Temp., Humidity, Gas & Environmental
      • Temperature & Humidity Sensor
      • Environmental Sensors
      • Gas and Dust Sensor
      • Thermoelectric Cooler
    • Motion, Light and Sound
      • PIR / IR and Optical Sensor
      • RFID Card, Tags & Reader
      • Light/Color Sensor
      • Line Sensor
      • Sound Sensor
    • Biometric, Rotation, and Current
      • Biometric/ECG/EMG Sensor
      • Rotary Encoder
      • Current and Voltage
    • Load, Pressure, Flow & Vibration
      • Water TDS, pH, Flow, Level and Pressure Sensor
      • Vibration/Tilt Sensor and Modules
      • Load / Pressure / Force / Flex Sensor
  • Cameras
    • IoT Cameras
    • FPV Cameras
    • Smart Vision Camera
    • Thermal Cameras
    • Raspberry Pi Camera
  • IoT and Wireless
    • Ai Thinker ESP Modules and Development Boards
    • ESP WiFi Module
    • Development Board/Kit
    • xBee Zigbee Module
    • LORA WiFi
    • Bluetooth and NRF Modules
    • GSM / GPRS Modules
    • Transmitter and Receivers
    • Advance Controller Board
    • Wireless Smart Switches
  • Electronic Modules
    • Programming Module
    • Memory Interfacing
    • Communication Module
    • Bluetooth Interfacing
    • Ethernet Module
    • Interface Module
    • LED Module
    • LASER Module
    • Addressable LED and Drivers
    • Breakout Board
    • Relay Switch Modules
    • Electronic Switches/Keypads
    • Solar Panels and Controllers
    • Wearable Electronic
    • Real Time Module (RTC)
    • Audio Module/ Amplifier
    • Mux-DeMux & Logic Converter
    • Voltage Regulator
      • Boost Converter (Step-Up )
      • Buck Converter (Step-Down)
    • Measuring Instruments
      • Digital Multimeter
      • Temperature Meter
      • Digital Voltage, Current and Frequency Meter
      • Oscilloscope & Signal Generator
      • Other Measuring Instrument
    • Power Supply
      • Transformers
      • SMPS
      • Hi-Link Power Supply Module
    • Displays
  • Wires and Cables
    • PVC and Silicone Wires
      • PVC Wire
      • 6 to 10 AWG
      • 12 to 16 AWG
      • 18 to 22 AWG
      • 24 to 30 AWG
    • Cables
      • DuPont / Jumper Cable
      • Interfacing Cables
      • JR Servo cable
      • Futaba servo cable
      • FFC Cable
    • Heat Shrink Tubing / Sleeve
      • Heat Shrink Combos
      • 1 mm to 4 mm
      • 5 mm to 10 mm
      • 11 mm and Above
      • PVC Heat Shrink
    • Tools and Accessories
      • Wire Cutter / Stripper
      • Cable Ties
      • Sleeves and Drag Chain
  • Mechanical Components and Workbench Tools
    • Mechanical Robotic Parts
      • Chassis
      • Aluminum Extrusion and Accessories
      • Smooth Rods
      • Lead Screw
      • Linear Guide Rail
      • Couplings
      • Bearings
      • Motor Mounting Brackets
      • Gears
    • Wheels
      • Mecanum Wheels
      • Omni Wheels
      • Heavy Duty Wheel
      • RC Car Wheel
      • Pulley Wheel & Track Belt
      • Caster Wheels
    • Carbon Fiber
      • Carbon Fiber Sheets and Strips
      • Carbon Fiber Tubes and Rods
    • Nuts-Bolts and Spacers
      • Countersunk(CSK) Screws
      • Socket Set Screws (Allen Grub)
      • Socket Head Cap Screw (Allen Bolt)
      • CHHD Screws
      • Nut and Washers
      • Nylon Nuts and Bolts
      • Spacer and Standoff
    • Soldering Tools
    • Workbench Tools
  • Services
    • PCB Manufacturing Service
    • Custom Battery Pack
    • Online SLA 3D Printing Service
    • Online FDM 3D Printing Service
    • Metal Laser Cutting Service
    • Non-Metal Laser Cutting Service
0 ₹ 0.00
All Categories
  • Shop by Brands
  • New Arrivals
  • Electronic Components
    • Basic Electronic Components
      • Component Kit
      • Resistor
      • Inductor
      • Capacitor
      • Diode
      • Transistor
      • Crystal Oscillators
    • Semiconductor ICs
      • Microcontroller ICs
      • Interface ICs
      • Clock, Timer and Counter ICs
      • Sensor ICs
      • Optocoupler ICs
      • Converter ICs
      • Comparator ICs
      • Driver ICs
      • Encoder ICs
      • Audio ICs
      • IC Base
    • LEDs and Indicators
      • LEDs Kit
      • Pilot Lamp Indicator
      • LEDs with Holders
      • Through Hole LED
      • SMD LED
    • Miscellaneous Component
      • Potentiometer
      • Fuse
      • Buzzer/Speaker
      • Aluminium Heat Sink
      • Bread Board and Zero PCB
    • Mechanical Switches
    • Power Connectors
    • RF Connectors
    • Interface Connector
    • Berg / FPC / IDC Connector
  • DIY Learning and Robot Kits
    • Orange Premium Learning Kits
      • Orange Kits for Arduinos
      • Orange Kits for Raspberry Pi
      • Orange Electronic Component Kits
      • Orange DIY Mini Project Kits
    • DIY Hobby Project Parts
    • Robot Kits and Parts
    • Drone Kit
    • DIY 3D Printer Kits
    • Ebike Kit
    • Official Raspberry Pi Kits
    • Kits compatible with Arduino
    • Sensor Kits
    • Component Kit
  • Drone Parts
    • Kits
    • Frames and Accessories
    • Flight Controller & Accessories
    • Motors
    • Speed Controllers (ESC)
    • Propellers
      • Upto 3 Inch
      • 3 Inch to 7 Inch
      • 8 Inch to 10 Inch
      • 11 Inch and Above
      • Carbon Fiber Propeller
      • Triblades
      • Propeller Accessories
    • Drone Transmitter & Receiver
    • Antennas
    • FPV Cameras
    • FPV Antennas and Trans-Receivers
    • Accessories
    • Camera Gimbal
  • E-Bike Parts
    • Ebike Kit
    • Ebike Motor and Controller
    • Ebike Battery
    • Mechanical Accessories
    • Electronics Accessories
  • 3D Printers and Parts
    • Creality 3D Printers
    • Electronics Parts
      • 3D Printer Display and Controllers
      • 3D Printer Extruder Kit
      • 3D Printer Extruder Parts and Fans
      • Stepper Motors and Accessories
      • 3D Printer Display and Controller
      • Limit Switch
    • Mechnical Parts
      • 3D Printer Heatbed and Accessories
      • 3D Printer Nozzle
      • Lead Screw and Nut
      • Linear Guide Rail
      • Aluminum Extrusion and Accessories
      • Smooth Rods
      • 3D Printer Couplings
      • Timing Belt and Pulley
      • Sleeves and Drag Chain
    • 3D Printer Filaments
      • ORANGE Premium Filaments
      • ESUN Filaments
      • Resins
  • Batteries, Chargers and Accessories
    • Custom Battery Pack
    • Lemon Premium Li-PO Battery
      • 2S Lipo (7.4V ~ 8.4V)
      • 3S Lipo (11.1V ~ 12.6V)
      • 4S Lipo (14.8V ~ 16.8V)
      • 6S LiPo (22.2V ~ 25.2V)
    • Orange LiPO Battery
      • 1 Cell (3.7-4.2)V
      • 2 Cell (7.4-8.4)V
      • 3 Cell (11.1-12.6)V
      • 4 Cell (14.8-16.8)V
      • 6 Cell (22.2-25.2)V
    • Micro LiPo Batteries
    • Lithium-Ion Batteries
      • 1 cell (3.7V~4.2V)
      • 2 Cell (7.4V~8.4V)
      • 3 Cell (11.1V~12.6V)
      • 4 Cell (14.8V~16.8V)
      • 5 Cell (18.5V) & Above
    • Orange Premium BMS
    • Other Batteries
      • TX/RX Li-PO Batteries
      • LifePO4 Battery
      • Coin Cell Battery
      • CNC and PLC Machine Battery
    • Battery Accessories
      • Battery Protection Board
      • Battery Pack Accessories & Holders
      • Battery Chargers
      • Battery Connector
      • Battery Harness
      • Power Adapter and Cable
      • Lipo Voltage Checker
      • Parallel Charging Board
      • LiPO Battery Sack, Covers & Mats
  • Motors, Drivers, Actuators
    • Planetary Gear Motor
      • Orange Planetary Gears Motor
      • Orange Planetary BLDC Motors
      • Planetary Gear DC Motors
    • Brushed DC Motor
      • Orange Johnson Geared Motor
      • Johnson Geared Motor (Grade B)
      • DC Geared Motor with Encoder
      • 25 GA Motors
      • Orange OG 555 DC Motor
      • RS 50 Geared Motor
      • Orange RS 775 DC Motor
      • Orange PM33 Motor
      • Orange Square Gear Box Motor
      • Orange Rectangular Gearbox Motor
    • N20 Micro Gear Motor
      • Micro Gear Motor with Encoder
      • Micro Gear Motor without Encoder
    • Stepper Motor
    • Servo Motors
      • Orange RC Servo Motors
      • Emax Servo Motor
      • Other Servo motor
    • Pumps
    • Cooling Fans
    • Linear Motor/Actuator
    • Solenoids & Electromagnets
    • Other DC Motors
      • BO Motors
      • Metal Gear Box Motor
      • Plastic Gear Box Motors
      • Vibration Motor
      • Drone Motor
    • Motor Drivers
      • Brushed DC Motor Driver
      • Servo Motor Driver
      • Stepper Motor Drivers
      • Brushless DC Motor Driver (ESC)
    • Motor Accessories
      • Motor Mounting Brackets
      • Bearings
      • Couplings
      • JR Servo Cable
      • Futaba Servo Cable
      • Push Rod
      • Other Accessories
  • Development Board
    • Official Arduino Boards
      • Original Arduino Boards
      • Official Arduino Shields
      • Official Arduino Kits
    • Raspberry Pi
    • 8051 Board
    • Single Board Computer
    • Teensy Board
    • Udoo Board
    • ARM Microcontroller
    • PIC Development board
    • Programmers
    • Advance Development Boards
    • Compatible with Arduino Boards
      • Boards
      • Shields
      • USB Cables for Arduino
      • Displays
      • Case for Arduino
  • Official Arduino Boards
    • Original Arduino Boards
    • Official Arduino Shields
    • Official Arduino Kits
  • Raspberry Pi
    • Official Boards and Hats
    • Official Accessories
    • Kits
    • Raspberry Pi Case
    • Display
    • Camera
    • Raspberry Pi Hats
    • Accessories
  • Displays
    • HMI LCD Display
    • LCD Displays
    • OLED Display
    • e-Ink Display
    • Seven Segment LED Display
    • LED Dot Matrix Display
  • Sensors
    • Sensor Kits
    • Ultrasonic and Proximity
      • MAXBOTIX Ultrasonic Sonar
      • Ultrasonic Sensor
      • Orange Proximity Sensor
      • Autonics Proximity Sensor
      • Other Proximity Sensor & Modules
      • LiDAR Sensor
      • Other Ultrasonic Sensors
    • Temp., Humidity, Gas & Environmental
      • Temperature & Humidity Sensor
      • Environmental Sensors
      • Gas and Dust Sensor
      • Thermoelectric Cooler
    • Motion, Light and Sound
      • PIR / IR and Optical Sensor
      • RFID Card, Tags & Reader
      • Light/Color Sensor
      • Line Sensor
      • Sound Sensor
    • Biometric, Rotation, and Current
      • Biometric/ECG/EMG Sensor
      • Rotary Encoder
      • Current and Voltage
    • Load, Pressure, Flow & Vibration
      • Water TDS, pH, Flow, Level and Pressure Sensor
      • Vibration/Tilt Sensor and Modules
      • Load / Pressure / Force / Flex Sensor
  • Cameras
    • IoT Cameras
    • FPV Cameras
    • Smart Vision Camera
    • Thermal Cameras
    • Raspberry Pi Camera
  • IoT and Wireless
    • Ai Thinker ESP Modules and Development Boards
    • ESP WiFi Module
    • Development Board/Kit
    • xBee Zigbee Module
    • LORA WiFi
    • Bluetooth and NRF Modules
    • GSM / GPRS Modules
    • Transmitter and Receivers
    • Advance Controller Board
    • Wireless Smart Switches
  • Electronic Modules
    • Programming Module
    • Memory Interfacing
    • Communication Module
    • Bluetooth Interfacing
    • Ethernet Module
    • Interface Module
    • LED Module
    • LASER Module
    • Addressable LED and Drivers
    • Breakout Board
    • Relay Switch Modules
    • Electronic Switches/Keypads
    • Solar Panels and Controllers
    • Wearable Electronic
    • Real Time Module (RTC)
    • Audio Module/ Amplifier
    • Mux-DeMux & Logic Converter
    • Voltage Regulator
      • Boost Converter (Step-Up )
      • Buck Converter (Step-Down)
    • Measuring Instruments
      • Digital Multimeter
      • Temperature Meter
      • Digital Voltage, Current and Frequency Meter
      • Oscilloscope & Signal Generator
      • Other Measuring Instrument
    • Power Supply
      • Transformers
      • SMPS
      • Hi-Link Power Supply Module
    • Displays
  • Wires and Cables
    • PVC and Silicone Wires
      • PVC Wire
      • 6 to 10 AWG
      • 12 to 16 AWG
      • 18 to 22 AWG
      • 24 to 30 AWG
    • Cables
      • DuPont / Jumper Cable
      • Interfacing Cables
      • JR Servo cable
      • Futaba servo cable
      • FFC Cable
    • Heat Shrink Tubing / Sleeve
      • Heat Shrink Combos
      • 1 mm to 4 mm
      • 5 mm to 10 mm
      • 11 mm and Above
      • PVC Heat Shrink
    • Tools and Accessories
      • Wire Cutter / Stripper
      • Cable Ties
      • Sleeves and Drag Chain
  • Mechanical Components and Workbench Tools
    • Mechanical Robotic Parts
      • Chassis
      • Aluminum Extrusion and Accessories
      • Smooth Rods
      • Lead Screw
      • Linear Guide Rail
      • Couplings
      • Bearings
      • Motor Mounting Brackets
      • Gears
    • Wheels
      • Mecanum Wheels
      • Omni Wheels
      • Heavy Duty Wheel
      • RC Car Wheel
      • Pulley Wheel & Track Belt
      • Caster Wheels
    • Carbon Fiber
      • Carbon Fiber Sheets and Strips
      • Carbon Fiber Tubes and Rods
    • Nuts-Bolts and Spacers
      • Countersunk(CSK) Screws
      • Socket Set Screws (Allen Grub)
      • Socket Head Cap Screw (Allen Bolt)
      • CHHD Screws
      • Nut and Washers
      • Nylon Nuts and Bolts
      • Spacer and Standoff
    • Soldering Tools
    • Workbench Tools
  • Services
    • PCB Manufacturing Service
    • Custom Battery Pack
    • Online SLA 3D Printing Service
    • Online FDM 3D Printing Service
    • Metal Laser Cutting Service
    • Non-Metal Laser Cutting Service
  • Home
  • Shop
    • Shop
    • Featured Brands
    • Bulk Enquiry
    • Track your order
    • Payment Options
  • Clearance Sale
  • New Arrivals
  • Services
    • 3D Printing
      • FDM
      • SLA
    • Laser Cutting
      • Non-metal
      • Metal
    • PCB Manufacturing
    • Custom Battery Pack
  • B2B
  • Blogs
    • Blogs
    • Tutorials
    • Videos
  • Careers
  • Support
  • Shop by Brands
  • New Arrivals
  • Electronic Components
    • Basic Electronic Components
      • Component Kit
      • Resistor
      • Inductor
      • Capacitor
      • Diode
      • Transistor
      • Crystal Oscillators
    • Semiconductor ICs
      • Microcontroller ICs
      • Interface ICs
      • Clock, Timer and Counter ICs
      • Sensor ICs
      • Optocoupler ICs
      • Converter ICs
      • Comparator ICs
      • Driver ICs
      • Encoder ICs
      • Audio ICs
      • IC Base
    • LEDs and Indicators
      • LEDs Kit
      • Pilot Lamp Indicator
      • LEDs with Holders
      • Through Hole LED
      • SMD LED
    • Miscellaneous Component
      • Potentiometer
      • Fuse
      • Buzzer/Speaker
      • Aluminium Heat Sink
      • Bread Board and Zero PCB
    • Mechanical Switches
    • Power Connectors
    • RF Connectors
    • Interface Connector
    • Berg / FPC / IDC Connector
  • DIY Learning and Robot Kits
    • Orange Premium Learning Kits
      • Orange Kits for Arduinos
      • Orange Kits for Raspberry Pi
      • Orange Electronic Component Kits
      • Orange DIY Mini Project Kits
    • DIY Hobby Project Parts
    • Robot Kits and Parts
    • Drone Kit
    • DIY 3D Printer Kits
    • Ebike Kit
    • Official Raspberry Pi Kits
    • Kits compatible with Arduino
    • Sensor Kits
    • Component Kit
  • Drone Parts
    • Kits
    • Frames and Accessories
    • Flight Controller & Accessories
    • Motors
    • Speed Controllers (ESC)
    • Propellers
      • Upto 3 Inch
      • 3 Inch to 7 Inch
      • 8 Inch to 10 Inch
      • 11 Inch and Above
      • Carbon Fiber Propeller
      • Triblades
      • Propeller Accessories
    • Drone Transmitter & Receiver
    • Antennas
    • FPV Cameras
    • FPV Antennas and Trans-Receivers
    • Accessories
    • Camera Gimbal
  • E-Bike Parts
    • Ebike Kit
    • Ebike Motor and Controller
    • Ebike Battery
    • Mechanical Accessories
    • Electronics Accessories
  • 3D Printers and Parts
    • Creality 3D Printers
    • Electronics Parts
      • 3D Printer Display and Controllers
      • 3D Printer Extruder Kit
      • 3D Printer Extruder Parts and Fans
      • Stepper Motors and Accessories
      • 3D Printer Display and Controller
      • Limit Switch
    • Mechnical Parts
      • 3D Printer Heatbed and Accessories
      • 3D Printer Nozzle
      • Lead Screw and Nut
      • Linear Guide Rail
      • Aluminum Extrusion and Accessories
      • Smooth Rods
      • 3D Printer Couplings
      • Timing Belt and Pulley
      • Sleeves and Drag Chain
    • 3D Printer Filaments
      • ORANGE Premium Filaments
      • ESUN Filaments
      • Resins
  • Batteries, Chargers and Accessories
    • Custom Battery Pack
    • Lemon Premium Li-PO Battery
      • 2S Lipo (7.4V ~ 8.4V)
      • 3S Lipo (11.1V ~ 12.6V)
      • 4S Lipo (14.8V ~ 16.8V)
      • 6S LiPo (22.2V ~ 25.2V)
    • Orange LiPO Battery
      • 1 Cell (3.7-4.2)V
      • 2 Cell (7.4-8.4)V
      • 3 Cell (11.1-12.6)V
      • 4 Cell (14.8-16.8)V
      • 6 Cell (22.2-25.2)V
    • Micro LiPo Batteries
    • Lithium-Ion Batteries
      • 1 cell (3.7V~4.2V)
      • 2 Cell (7.4V~8.4V)
      • 3 Cell (11.1V~12.6V)
      • 4 Cell (14.8V~16.8V)
      • 5 Cell (18.5V) & Above
    • Orange Premium BMS
    • Other Batteries
      • TX/RX Li-PO Batteries
      • LifePO4 Battery
      • Coin Cell Battery
      • CNC and PLC Machine Battery
    • Battery Accessories
      • Battery Protection Board
      • Battery Pack Accessories & Holders
      • Battery Chargers
      • Battery Connector
      • Battery Harness
      • Power Adapter and Cable
      • Lipo Voltage Checker
      • Parallel Charging Board
      • LiPO Battery Sack, Covers & Mats
  • Motors, Drivers, Actuators
    • Planetary Gear Motor
      • Orange Planetary Gears Motor
      • Orange Planetary BLDC Motors
      • Planetary Gear DC Motors
    • Brushed DC Motor
      • Orange Johnson Geared Motor
      • Johnson Geared Motor (Grade B)
      • DC Geared Motor with Encoder
      • 25 GA Motors
      • Orange OG 555 DC Motor
      • RS 50 Geared Motor
      • Orange RS 775 DC Motor
      • Orange PM33 Motor
      • Orange Square Gear Box Motor
      • Orange Rectangular Gearbox Motor
    • N20 Micro Gear Motor
      • Micro Gear Motor with Encoder
      • Micro Gear Motor without Encoder
    • Stepper Motor
    • Servo Motors
      • Orange RC Servo Motors
      • Emax Servo Motor
      • Other Servo motor
    • Pumps
    • Cooling Fans
    • Linear Motor/Actuator
    • Solenoids & Electromagnets
    • Other DC Motors
      • BO Motors
      • Metal Gear Box Motor
      • Plastic Gear Box Motors
      • Vibration Motor
      • Drone Motor
    • Motor Drivers
      • Brushed DC Motor Driver
      • Servo Motor Driver
      • Stepper Motor Drivers
      • Brushless DC Motor Driver (ESC)
    • Motor Accessories
      • Motor Mounting Brackets
      • Bearings
      • Couplings
      • JR Servo Cable
      • Futaba Servo Cable
      • Push Rod
      • Other Accessories
  • Development Board
    • Official Arduino Boards
      • Original Arduino Boards
      • Official Arduino Shields
      • Official Arduino Kits
    • Raspberry Pi
    • 8051 Board
    • Single Board Computer
    • Teensy Board
    • Udoo Board
    • ARM Microcontroller
    • PIC Development board
    • Programmers
    • Advance Development Boards
    • Compatible with Arduino Boards
      • Boards
      • Shields
      • USB Cables for Arduino
      • Displays
      • Case for Arduino
  • Official Arduino Boards
    • Original Arduino Boards
    • Official Arduino Shields
    • Official Arduino Kits
  • Raspberry Pi
    • Official Boards and Hats
    • Official Accessories
    • Kits
    • Raspberry Pi Case
    • Display
    • Camera
    • Raspberry Pi Hats
    • Accessories
  • Displays
    • HMI LCD Display
    • LCD Displays
    • OLED Display
    • e-Ink Display
    • Seven Segment LED Display
    • LED Dot Matrix Display
  • Sensors
    • Sensor Kits
    • Ultrasonic and Proximity
      • MAXBOTIX Ultrasonic Sonar
      • Ultrasonic Sensor
      • Orange Proximity Sensor
      • Autonics Proximity Sensor
      • Other Proximity Sensor & Modules
      • LiDAR Sensor
      • Other Ultrasonic Sensors
    • Temp., Humidity, Gas & Environmental
      • Temperature & Humidity Sensor
      • Environmental Sensors
      • Gas and Dust Sensor
      • Thermoelectric Cooler
    • Motion, Light and Sound
      • PIR / IR and Optical Sensor
      • RFID Card, Tags & Reader
      • Light/Color Sensor
      • Line Sensor
      • Sound Sensor
    • Biometric, Rotation, and Current
      • Biometric/ECG/EMG Sensor
      • Rotary Encoder
      • Current and Voltage
    • Load, Pressure, Flow & Vibration
      • Water TDS, pH, Flow, Level and Pressure Sensor
      • Vibration/Tilt Sensor and Modules
      • Load / Pressure / Force / Flex Sensor
  • Cameras
    • IoT Cameras
    • FPV Cameras
    • Smart Vision Camera
    • Thermal Cameras
    • Raspberry Pi Camera
  • IoT and Wireless
    • Ai Thinker ESP Modules and Development Boards
    • ESP WiFi Module
    • Development Board/Kit
    • xBee Zigbee Module
    • LORA WiFi
    • Bluetooth and NRF Modules
    • GSM / GPRS Modules
    • Transmitter and Receivers
    • Advance Controller Board
    • Wireless Smart Switches
  • Electronic Modules
    • Programming Module
    • Memory Interfacing
    • Communication Module
    • Bluetooth Interfacing
    • Ethernet Module
    • Interface Module
    • LED Module
    • LASER Module
    • Addressable LED and Drivers
    • Breakout Board
    • Relay Switch Modules
    • Electronic Switches/Keypads
    • Solar Panels and Controllers
    • Wearable Electronic
    • Real Time Module (RTC)
    • Audio Module/ Amplifier
    • Mux-DeMux & Logic Converter
    • Voltage Regulator
      • Boost Converter (Step-Up )
      • Buck Converter (Step-Down)
    • Measuring Instruments
      • Digital Multimeter
      • Temperature Meter
      • Digital Voltage, Current and Frequency Meter
      • Oscilloscope & Signal Generator
      • Other Measuring Instrument
    • Power Supply
      • Transformers
      • SMPS
      • Hi-Link Power Supply Module
    • Displays
  • Wires and Cables
    • PVC and Silicone Wires
      • PVC Wire
      • 6 to 10 AWG
      • 12 to 16 AWG
      • 18 to 22 AWG
      • 24 to 30 AWG
    • Cables
      • DuPont / Jumper Cable
      • Interfacing Cables
      • JR Servo cable
      • Futaba servo cable
      • FFC Cable
    • Heat Shrink Tubing / Sleeve
      • Heat Shrink Combos
      • 1 mm to 4 mm
      • 5 mm to 10 mm
      • 11 mm and Above
      • PVC Heat Shrink
    • Tools and Accessories
      • Wire Cutter / Stripper
      • Cable Ties
      • Sleeves and Drag Chain
  • Mechanical Components and Workbench Tools
    • Mechanical Robotic Parts
      • Chassis
      • Aluminum Extrusion and Accessories
      • Smooth Rods
      • Lead Screw
      • Linear Guide Rail
      • Couplings
      • Bearings
      • Motor Mounting Brackets
      • Gears
    • Wheels
      • Mecanum Wheels
      • Omni Wheels
      • Heavy Duty Wheel
      • RC Car Wheel
      • Pulley Wheel & Track Belt
      • Caster Wheels
    • Carbon Fiber
      • Carbon Fiber Sheets and Strips
      • Carbon Fiber Tubes and Rods
    • Nuts-Bolts and Spacers
      • Countersunk(CSK) Screws
      • Socket Set Screws (Allen Grub)
      • Socket Head Cap Screw (Allen Bolt)
      • CHHD Screws
      • Nut and Washers
      • Nylon Nuts and Bolts
      • Spacer and Standoff
    • Soldering Tools
    • Workbench Tools
  • Services
    • PCB Manufacturing Service
    • Custom Battery Pack
    • Online SLA 3D Printing Service
    • Online FDM 3D Printing Service
    • Metal Laser Cutting Service
    • Non-Metal Laser Cutting Service
Robu.in | Indian Online Store | RC Hobby | Robotics
  • Search
  • 0
HomeBlogsOrange Basic Kit For Arduino Beginners

Orange Basic Kit For Arduino Beginners

Blogs, Orange Arduino Kits, Orange Kits  0  comments  836 Views  Tuesday, June 15, 2021


Orange Basic Kit!! Here the quest to learn Arduino will end.

Orange Basic Kit for arduino

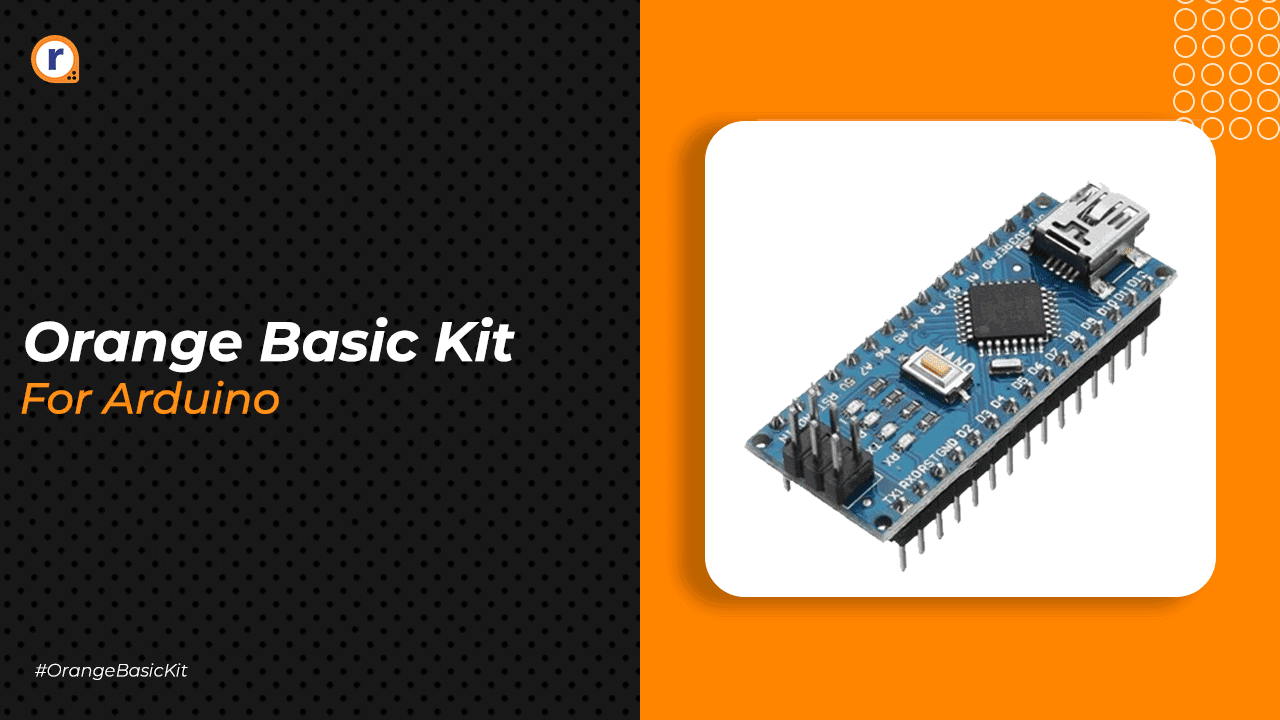
Hello friends, today we are going to learn about the Orange Arduino Basic Kit. This Orange Basic Kit is available in three variants on Robu. You can choose your kit based on your requirement.

  1. Orange Basic Kit Compatible With Arduino Uno
  2. Orange Basic Kit Compatible With Arduino Mega
  3. Orange Basic Kit Compatible With Arduino Nano

Today every geek wants to learn Arduino, but due to so many options available in the market, he fails to make the right decision where to start.

And because of this, he eventually loses hope of learning Arduino. But don't worry, we are here to help you, we know your need, and here we have brought our basic kit for Arduino beginners.

This kit is specially designed for Arduino beginners, and you get everything in this kit.

I have added below the list of products you can see in this kit. Please have a look.

Components List

As you now know about the list of components you get in this kit. Let us now learn about each of those components.

Note- I have tried to explain everything about this kit in the sections below, but if you have any doubts, please let us know in the comments section.

As we are working with the Arduino related kits we will have to install the Arduino IDE on our system.

You can download the Arduino IDE by clicking on the link below.

Arduino IDE

How To Upload Code To Your Arduino?

Arduino IDE

It is the first thing every Arduino beginner should know. This section of this blog will tell you about how to upload the sketch to the Arduino board. Please check the above image to understand the GUI of the Arduino IDE.

Follow these steps to upload your sketch:

  1. Connect your Arduino using the USB cable.
  2. Choose Tools>Board>Arduino Uno to find your board in the Arduino menu.
  3. Choose the correct serial port for your board.
  4. Click the Upload button.

Active Components And Passive Components

Active Components

An active component is a component that does not require an external source of energy for its functioning.

Common Examples of Active Components Include:

  • Voltage sources
  • Current sources
  • Generators (such as alternators and DC generators)
  • All different types of transistors (such as bipolar junction transistors, MOSFETS, FETs, and JFET)
  • Diodes (such as Zener diodes, photodiodes, Schottky diodes, and LEDs)

Passive Components

As the name 'Passive' suggests - Passive devices neither power the circuit nor amplify the signal. The functioning of such components depends on the output of active components.

Common examples of passive components include:

  • Resistors
  • Inductors
  • Capacitors
  • Transformers

Resistors

Resistor
Resistor

Resistors are passive components. They do not power the circuit but play a very important role in electric circuits.

The resistor only allows the required amount of energy to pass through it and dissipates the remaining energy in the form of heat.

We require resistors in many applications, and therefore choosing the correct value resistor is also an important task.

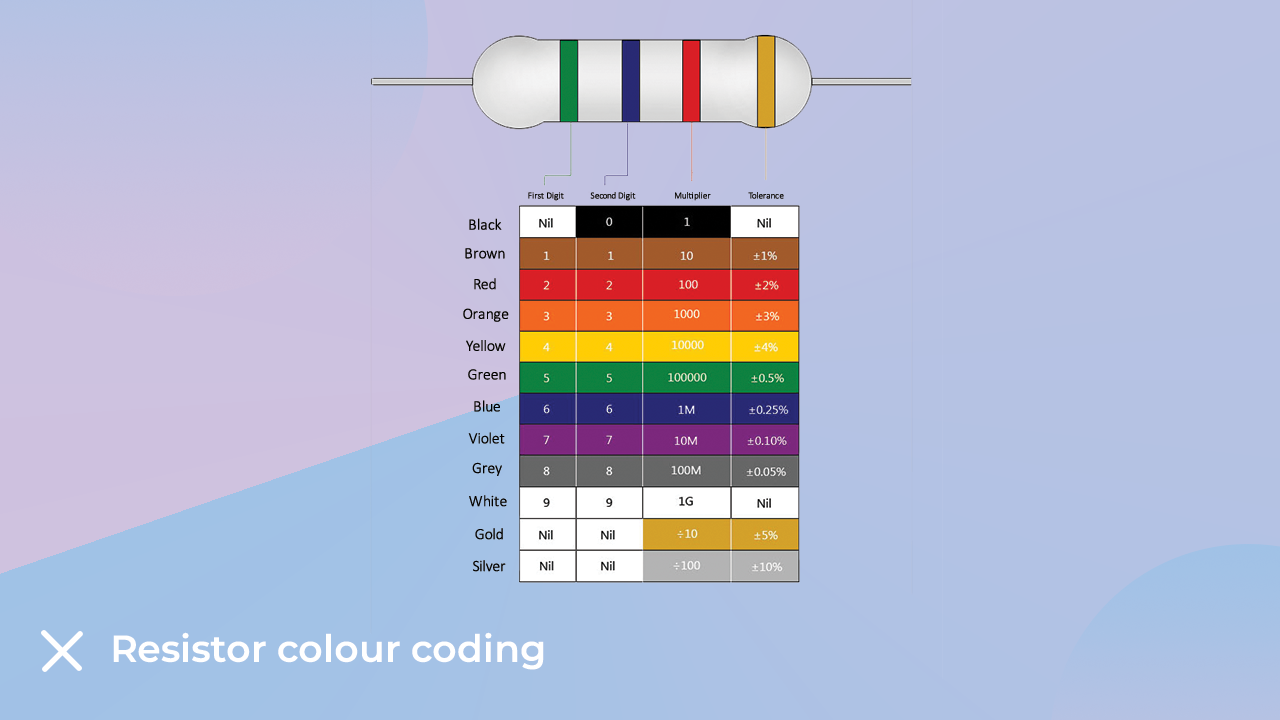
Now you may be wondering how the value of the resistor is calculated. It is very easy. You need to check the color band printed on the resistor.

In the above image of the resistor, I have mentioned the color band, and also, I have shown the method of calculating the resistor value. or you can check this link.

Another way to measure the value of a resistor is to use a digital multi meter.

If you have a digital multi meter, you can connect the multi meter probe to resistor and calculate the value of the resistor.

So, I think this is enough about the resistor. If you have any doubt, you can ask me in the comment section.

Capacitors

Capacitors
Capacitor

Capacitors are considered passive components. They are made of two-conductor plates and some dielectric material.

The dielectric material is placed between two conductive materials. The greater the distance between the two conductor plates, the greater the value of the capacitor.

Although the capacitor stores the charge, the capacitor is not called an active component. Because it takes the input voltage from the power supply; and discharges when the power is cut off.

There are many applications in which capacitors are used, some of those applications I have mentioned below.

1) Timer circuit -

In this, capacitors are used to change the transistor states.

Here I am sharing the link to the documentation of the timer circuit.

Link

2) Capacitors is also used as DC Filters.

So, it was all about the capacitor. If you have any doubt about this section, please let me know in the comment section.

LED

LED (Ligh Emitting Diode)
What-is-a-LED

An LED light-emitting diode is used as an indicator in an Arduino circuit. If you are an Arduino beginner, the best option would be to start with an LED interfacing.

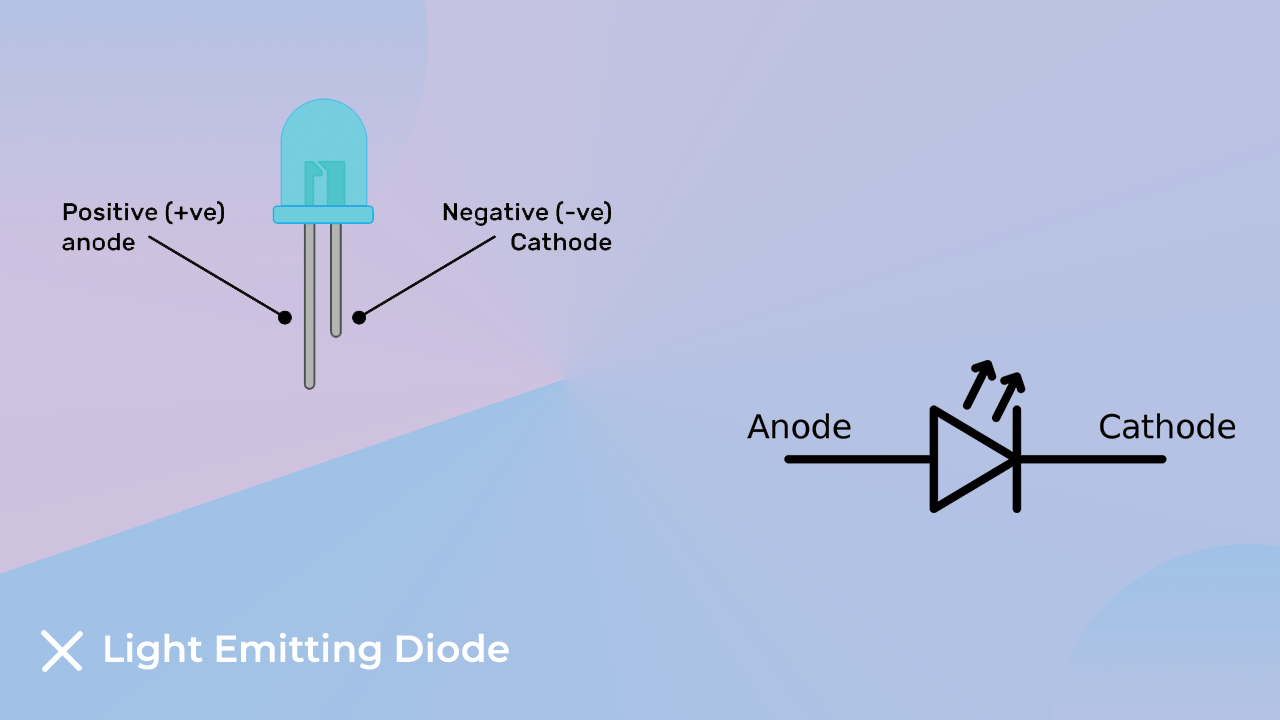
As I mentioned earlier, LED is just a diode that emits a light energy when it exceeds a specific cut-off voltage.

In the following section, we will understand the basics of LED.

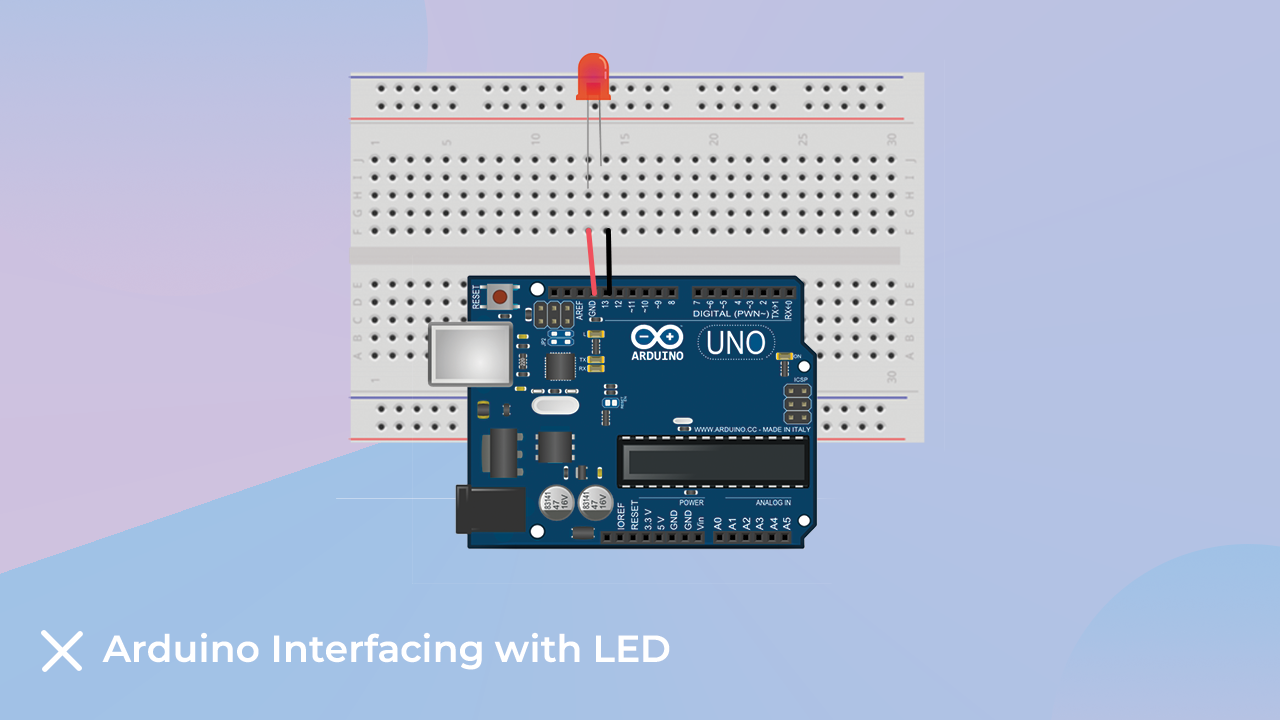
LED Interfacing with Arduino

The LED consists of two-pin anodes and a cathode. In the below image you can see we have connected the cathode terminal to the GND terminal of the Arduino and the anode terminal to GPIO 13.

You can refer to the following image to understand the interfacing of LED with Arduino.

LED interfacing with the arduino
LED Interfacing With Arduino
Arduino Code For LED
void setup() {
 
  pinMode(13, OUTPUT);
}
void loop() {
  digitalWrite(13, LOW); 
  delay(300);                          

  digitalWrite(13, HIGH); 
  delay(300);  

}

Sensors

We are in the world of the IoT era.

Nowadays, we see sensors everywhere. A bike has sensors. The phone has sensors and more.

Sensors for electronic circuits are like human organs. They understand the surrounding atmospheric changes and convert those sensory data into digital form and deliver them to electronic circuits.

There are mainly two types of sensors available in the market, and they are given below.

  1. Analog sensor - This type of sensor produces analog output. The output voltage/current of such sensors varies according to the change in input quantity.
  2. Digital sensor - The output of such sensor will be either high or low.
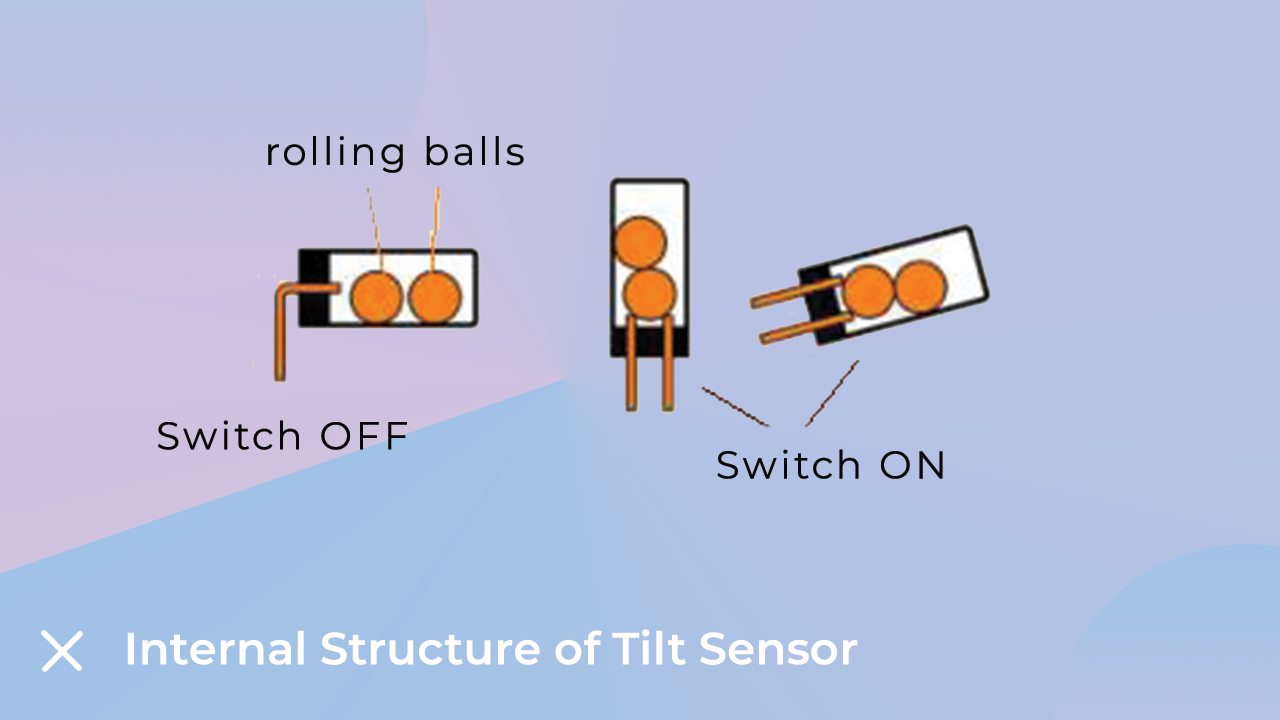
Tilt Sensor

Tilt Sensor Pinout
Tilt Sensor

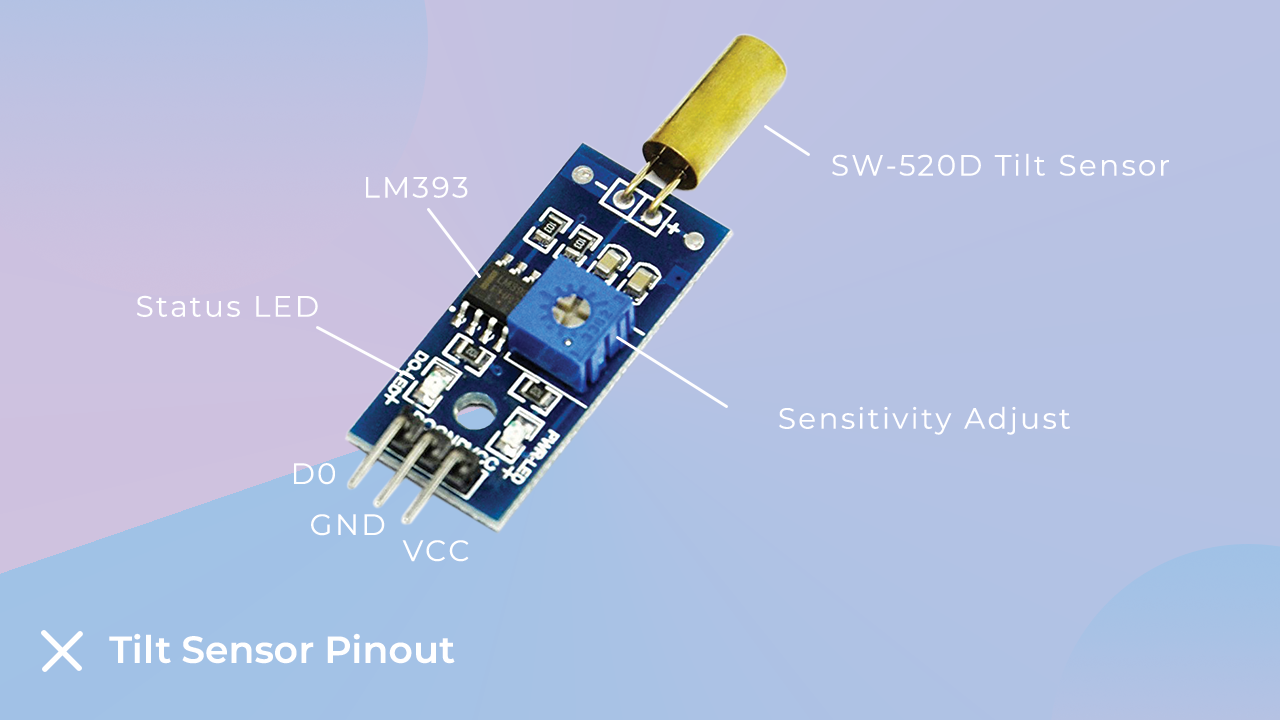
This sensor allow you to detect orientation or tilt.

The working principle of tilt sensors is very simple. The tilt sensor produces electrical signals that vary with changes in an angular moment. These sensors have a rolling ball inside. This rolling ball is wrapped in conductive material.

When the sensor is on and in the horizontal direction, the rolling ball falls downward, and an electrical connection occurs. And when the sensor is tilted, the rolling ball does not go down, and there is no electrical connection.

The Following image will clear your doubt.  

Ball-type-tilt-switch

Interfacing The Tilt Sensor with Arduino

By reading the above line, you might be thinking that if this is the switch, we can connect this tilt sensor to the Arduino in the same way that we connect the switch to the Arduino.

Yes, you are right. As I told you earlier, the tilt switch is just a switch, and we can interface it with Arduino in the same way that we interface a switch with Arduino.

I connected my tilt sensor to Arduino in the following way. First, I connected the signal pin of the tilt sensor to the five number pin of the Arduino and the Vcc pin of the Tilt sensor to the 5v of the Arduino, while the gnd pin of the Arduino to the Gnd pin of the tilt sensor.

Tilt Sensor
Interfacing of The Tilt Sensor With The Arduino

Arduino Code For Tilt Sensor

The complete Arduino code for tilt Sensor is given at the end.

When the sensor is tilted, the sensor will generate a high signal. And then, as per the set condition In our code, the Arduino will turn on the onboard LED.

Congratulation, In this way, you have learned how to interface the tilt sensor with the Arduino.

void setup() {

  pinMode(3, INPUT);
  Serial.begin(9600);
}
int val = 0;
void loop() {
  val = analogRead(5);
  Serial.print("Sensor Input = ");
  Serial.println(val);
  delay(100);

}

In the next section of this blog we will learn about the LDR.

LDR Sensor

LDR pinout
LDR-Pinout

The light-dependent resistor is just a resistor. And the value of this resistor varies according to the change in intensity of light.

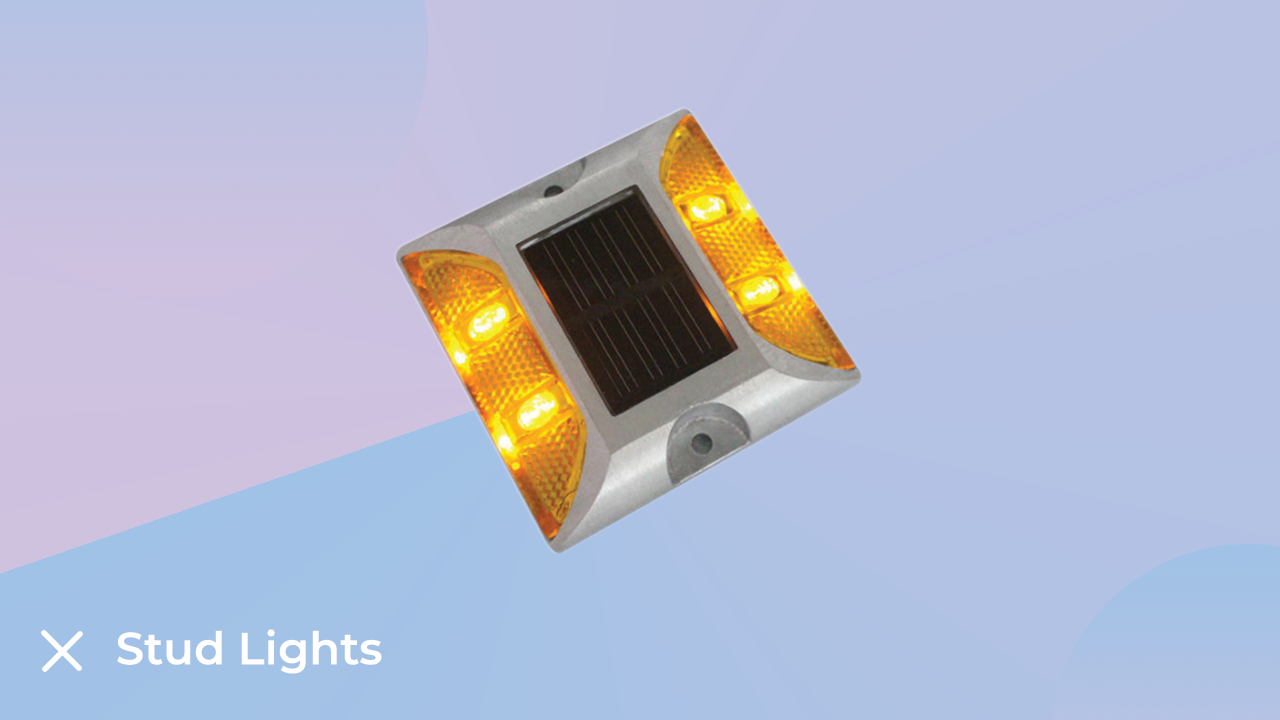
You must have seen the stud lights on the streets. Those lights use LDR to detect light.

Application of the LDR sensor

Stud Lights
Stud Light

As I mentioned earlier, LDR is used for light detection applications. Based on this feature, we can use it in a wide variety of projects. I have mentioned some of those applications below. Please take a look.

1. In a solar cell charging unit, the LDR can be used to detect the intensity of light. Depending on the readings the control unit receives from the LDR, the controlling unit can rotate the solar panel to generate maximum energy.

2. Light Tracking Robot -

This is a very popular example in which we can see the use of LDR. You may have seen the video of the light following robot on YouTube. Those types of the robots can be designed with the help of the LDR sensor.

3. Stud Lights -

You must have seen the stud lights on the streets. Those lights are used for indication purposes. LDRs are used to detect daylight in those lights.

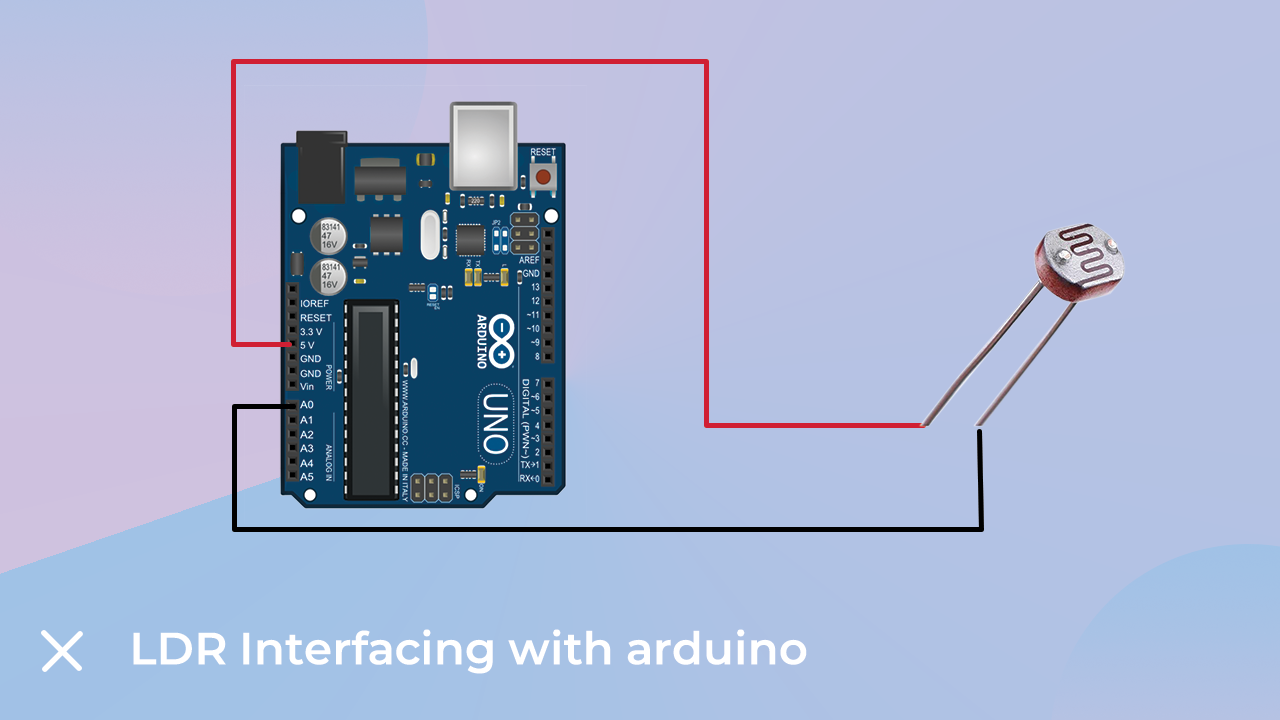
Interfacing LDR with Arduino

LDR's interfacing is so easy.

Please refer to the following image to understand the interfacing of LDR with Arduino.

LDR interfacing With the arduino
LDR Interfacing With Arduino

Arduino Code For LDR

void setup() {
 
  pinMode(A0, INPUT);
  Serial.begin(9600);
}
void loop() {
  
  digitalWrite(13, LOW); 
  delay(300);                          

  digitalWrite(13, HIGH); 
  delay(300);  

}

I hope you understood the working of LDR sensor with the Arduino. In the next section of this blog, we will learn about the LM35 sensor.

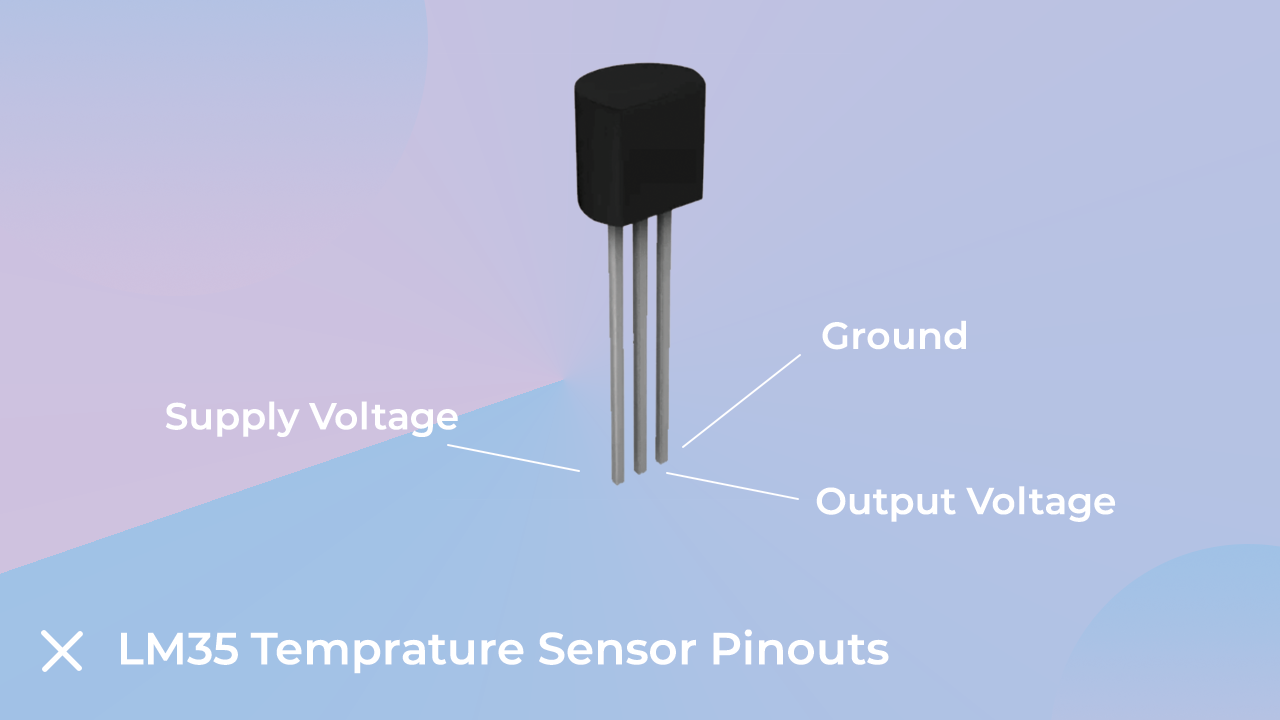
LM35 Temperature Sensor

LM 35 Sensor
LM3 Temp Sensor

The LM35 sensor is designed to measure the temperature of solid objects.

The output of this sensor is analog and If you learn to read this sensor's output, you will understand the working of the most of the analog sensors.

I know that apart from this analog sensor, there are many other things that we should know about analog sensors but to understand the basics of analog the sensor, this sensor is the best option.

Pin Description Of LM35 Sensor

  • VCC: Supply Voltage (4V – 30V)
  • Out: It gives analog output voltage (in degrees Celsius)
  • GND: Ground

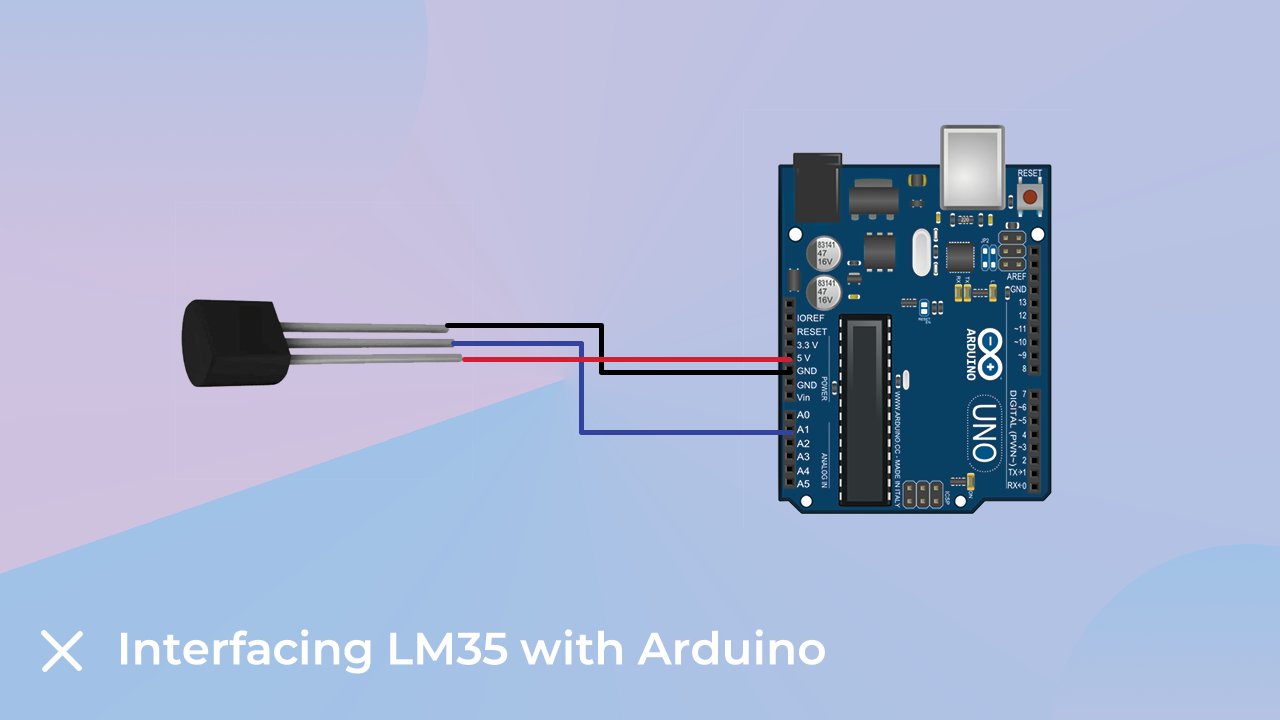
Interfacing The LM35 With Arduino

We have used some jumper cables to interface the LM35 Sensor with the Arduino.

Since the sensor's output is analog in nature, we need to connect the output pin of the sensor to any analog pin of the Arduino.

In my case, I connected the output pin of the sensor to the A1 pin of the Arduino.

Please refer to the following image to understand interfacing.

LM35 Sensor
LM35 Sensors

Arduino code for LM35 Sensor

You can use the below-mentioned code for communicating with LM35 Sensor.

To check the output of the sensor, you will have to open the Serial Monitor.

const int lm35_pin = A1;	
void setup() {
  Serial.begin(9600);
}

void loop() {
  int temp_adc_val;
  float temp_val;
  temp_adc_val = analogRead(lm35_pin);
  temp_val = (temp_adc_val * 4.88);	
  temp_val = (temp_val/10);	
  Serial.print("Temperature = ");
  Serial.print(temp_val);
  Serial.print(" Degree Celsius\n");
  delay(1000);
}

So, in this way, we learned to interface the LM35 sensor with the Arduino. In the next section of this blog, we will learn interfacing the switch with Arduino.

Interfacing the switch with Arduino.

Types of Switches
Types Of Switches

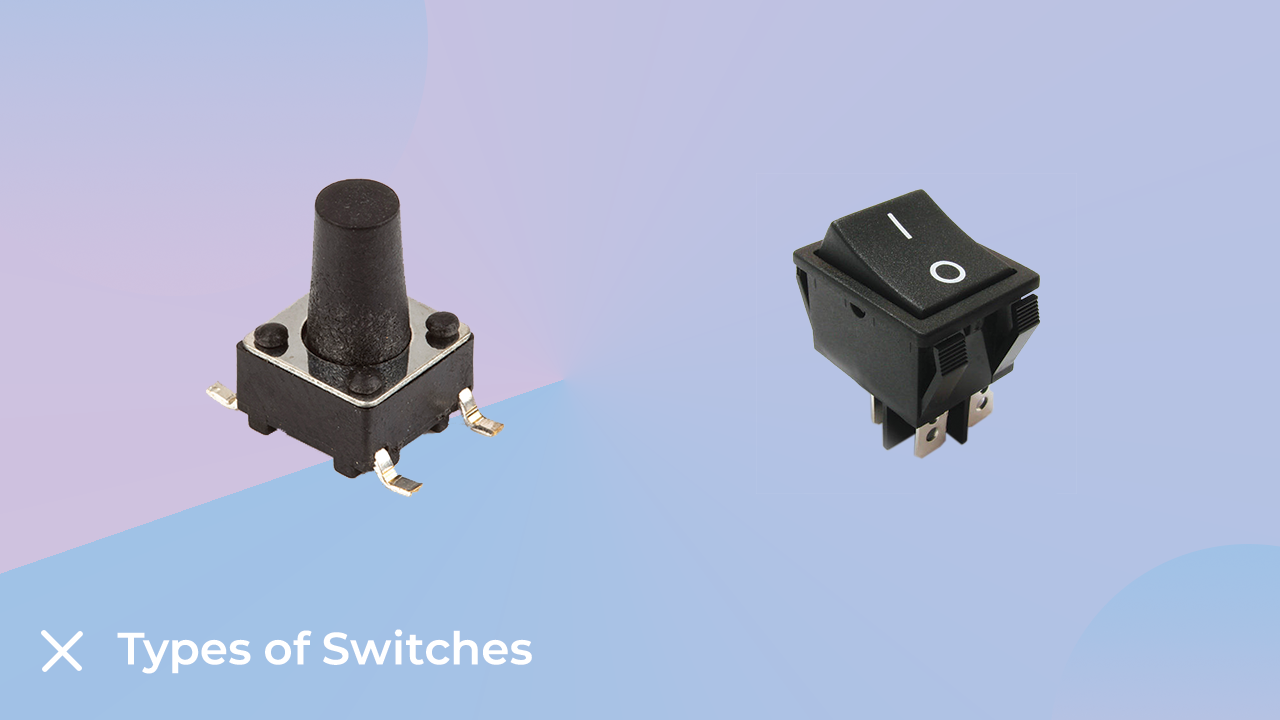
Everyone knows about the switch, in this section you will learn about the type of switches available in the market.

1) Push-pull switches -

These switches work just like normal switches. The only difference is that the lever of this switch is horizontal. In addition, this switch has a spring and locking mechanism.

When you press this switch, the spring get compressed, and the locking mechanism locks the switch. This is how the connection happens.

After that, when you press the switch again, the locking mechanism unlocks the switch, and the connection breaks and the switch acts as an off switch.

2) Rocker Switch -

This type of switch is the same switch used in home appliances. The entire assembly of this switch is enclosed in the box, and a spring attachment button is placed above it.

The remaining function is similar to other types of switches. When you press it, it attaches to the metal contacts, and the connection occurs, and when you press it again, it loses contact with the metal contacts and returns to its initial position.

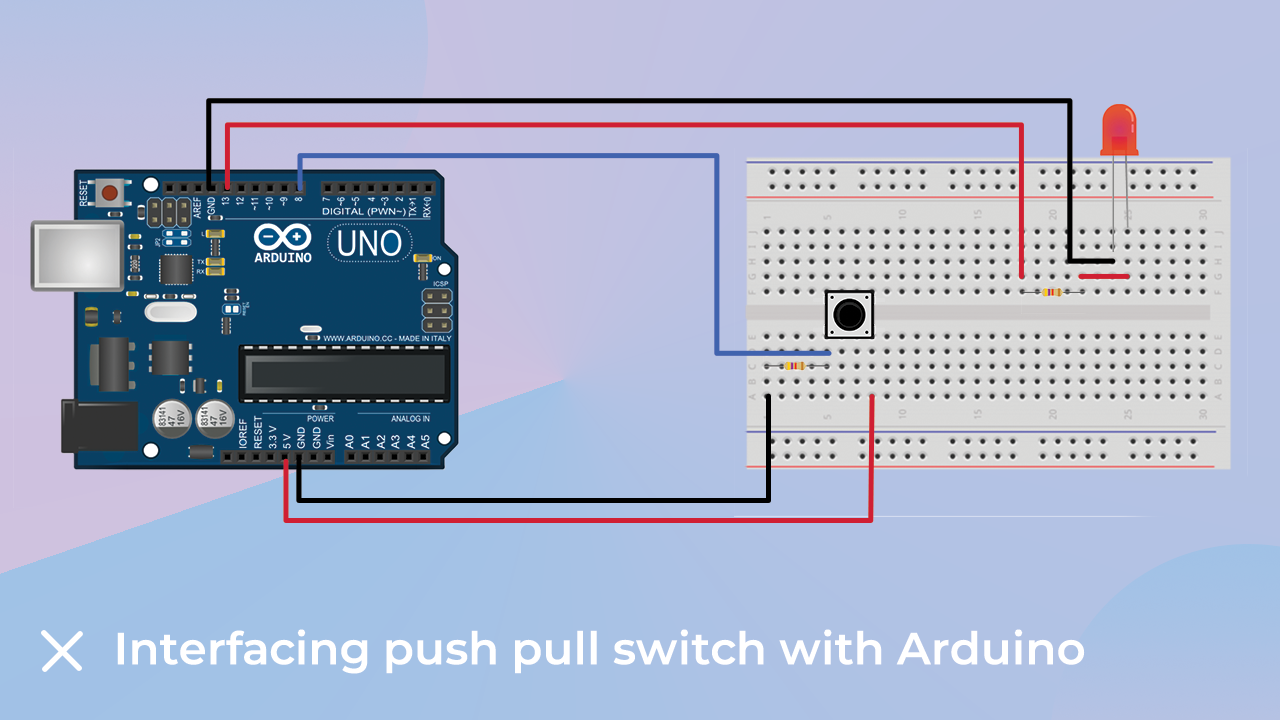
The switch you are getting with this kit is a push-pull type switch. It has two pins, and the interfacing part of the switch with the Arduino is a really simple task.

In the below image, we have connected the VCC pin to the 5V pin of the arduino and GND pin to the eight number pin of the Arduino.

Please see the following image to make the connection properly.

Interfacing Push pull switch with the Arduino.
Interfacing Push-pull switch with the Arduino

Arduino Code for Switch

In the following code, we have used the state_variable to store the current state of the switch.

You can upload the code to your Arduino and see the output on the serial monitor.

 
const int buttonPin = 8; // the number of the pushbutton pin
const int ledPin = 2; // the number of the LED pin
// variables will change:
int buttonState = 0; // variable for reading the pushbutton status
 
void setup() {
   // initialize the LED pin as an output:
   pinMode(ledPin, OUTPUT);
   // initialize the pushbutton pin as an input:
   pinMode(buttonPin, INPUT);
}
 
void loop() {
   // read the state of the pushbutton value:
   buttonState = digitalRead(buttonPin);
   // check if the pushbutton is pressed.
   // if it is, the buttonState is HIGH:
   if (buttonState == HIGH) {
      // turn LED on:
      digitalWrite(ledPin, HIGH);
   } else {
      // turn LED off:
      digitalWrite(ledPin, LOW);
   }
}

So in this way, you have learned the basics of all the components available in the kit.

In the next part of this blog, we will learn about the projects we can do using the components we get in this kit.

Arduino Blink Project

It is a very basic project specially designed for Arduino beginners. To complete this project, you will have to use the following components.

Parts required for the Arduino Blink Project

  • LED
  • Arduino
  • Jumper Cables
  • Breadboard

How to test the components?

Before you start, you should know the basics of all these sensors. If you do not know the basics of these components then you will not be able to control these components through Arduino.

So, I request you read about the components used in this kit.

In this section of this blog, we will do the testing of the components before using them.

LED Testing

As I told you earlier, the LED is a light-emitting diode and to tests the functionality of the LED. First, you have to connect the right terminal to the right pin of the Arduino.

If you check the pins of the LED, you will see a difference. One pin of the LED is smaller than the other pin. You may be thinking that this may be a manufacturing defect, but it is not.

The pin which is shorter in length is the anode pin of that LED and the other pin is the cathode pin.

So, to test the LED, you have to connect the anode pin of the LED to the 5V pin of the Arduino and the other pin to the GND pin of the Arduino.

There is one more point I forgot to mention, and that is that you have to connect 320ohm or 200ohm between the anode pin of the LED and the 5V pin of the Arduino.

OK, Now, please verify all connections and see if the LED is blinking. If not, congratulations, you have successfully entered the world of electronics by blowing out the first component.

Jokes apart, if the LED is not flashing, it means that you have not made the connection properly. So please double-check the connection, and if the problem persists, please try using another LED.

If you still have any problem, then you please mention your problem in the comment section below.

As you have now completed the LED test and you know that your LED is in working condition. We will proceed to the next part of this blog.

Interfacing the LED with the Arduino Board

When testing the LED, we were connecting the anode terminal of the LED to the vcc terminal of the Arduino. But this time, we will connect the LED's anode terminal to the Arduino's 3 GPIO pins.

Please refer to the following image to understand the interfacing diagram.

Arduino LED Interfacing
LED Interfacing With Arduino

Arduino Code for LED Blinking Project

You must upload the following Arduino code to Arduino.

In the following code you can see two things, VoidSetup () and VoidLoop () function.

These functions are inbuilt and cannot be changed. If you change the characters of the names of these functions, then the error will be raised by the Arduino IDE. So please do not change these functions. Use them as it is.

What is void setup() in Arduino IDE?  

As I told you earlier, this function is the inbuilt function. In this function, we set the pin mode.

In this function, we use the pinMode () method. This method takes two parameters. One PIN and the other pin function.

In our case, we are using pin number 13 and the function of that pin output.

 If we were using a sensor, we will have to set it to INPUT.

Another significance of this function is that this function executes at the initial stage only.

So, if you are doing any calibration in your project, then you can use this function. You can write your calibration-code in this section.

What is the void loop() in Arduino IDE?

It is another inbuilt function that you see when opening the Arduino IDE.

You can write code in this loop. This loop is a continuously running loop and continues until you turn off the Arduino or press the reset button.

So this is how you learned the basics of Arduino code. Now we will move on to the coding part of the LED.

There is one more thing in this code. In voidloop (), we have written four lines. Those lines are responsible for turning the LED on and off after every 200 seconds.

digitalWrite(Pin, HIGH or LOW);

This method is used to turn the LED on or off. It is the inbuilt function of the Arduino IDE and cannot be changed.

This function also takes two parameters. One is the pin number and the other is the output type.

delay(time_sec)

Like other inbuilt functions, this delay function is also the inbuilt function of Arduino. However, this function takes only one parameter, and that parameter is time.

For example, Delay (2000);

If you add the above line to your code, That line will add delay of 2 second in execution of the code.

Now as you know everything about the code, you can copy the following code and upload it to Arduino.

const int buttonPin = 8; // the number of the pushbutton pin
const int ledPin = 2; // the number of the LED pin
// variables will change:
int buttonState = 0; // variable for reading the pushbutton status

void setup() {
   // initialize the LED pin as an output:
   pinMode(ledPin, OUTPUT);
   // initialize the pushbutton pin as an input:
   pinMode(buttonPin, INPUT);
}

void loop() {
   // read the state of the pushbutton value:
   buttonState = digitalRead(buttonPin);
   // check if the pushbutton is pressed.
   // if it is, the buttonState is HIGH:
   if (buttonState == HIGH) {
      // turn LED on:
      digitalWrite(ledPin, HIGH);

   } else {
      // turn LED off:
      digitalWrite(ledPin, LOW);
   }
}

Arduino LED brightness control Project

In our previous section, we learned how to interface LED with Arduino and learned to blink Arduino. In this section, we will go a little further and learn how to control the brightness of the LED using PWM technology.

So as we have already learned how to connect the LED to the Arduino in this section, I will not talk about that part again.

You do not need to change the connection for this project but you can change the connection if you want. If you have made up your mind to change the connection then make sure that you will change it in your code also.

Talking about this project, the basic information you should have while working on this project is controlling the brightness of the LED, which means that we are controlling the input voltage to the LED.

Components you may require for this project

  • LED
  • Arduino
  • Jumper Cables
  • Breadboard

Arduino Code for LED Brightness Project

As previously discussed, we are controlling the brightness of the LED, which means that we are controlling the input voltage in the LED.

In our previous project we used the digitalWrite method to control the LED, but in this case of the project, we cannot use the digitalWrite function because this function can put 5V or 0v on its GPIO pin.

Which means that we cannot use the digitalWrite function to control the brightness of the LED.

We have to use the AnalogWrite function. If you have not heard of this function before then you can check more about that function here.

In the following code we have used the analog function and the For Loop. You can learn more about both of these terms here.

You can use the following code to control the brightness of the LED. In the following code I have used for loop but if you are good at coding or learning different methods of how to code then you can use your logic.

const int ledPin = 13; // the number of the LED pin

void setup() {
   // initialize the LED pin as an output:
   pinMode(ledPin, OUTPUT);
}

void loop() {
   for(int i= o; i< 249; i++)
{
   analogWrite(ledpin, i);
   delay(200);
}
}

Arduino Day-Night Tracker Project

This is another project that we can design using the components of this kit. It will be a little advance project, but don't worry, I will clear all your doubts.

To complete the project, you need the following components.

List of the components

  • LDR
  • Arduino
  • Jumper Cables
  • Breadboard
  • Buzzer

Interfacing Diagram for Arduino Day-Night Tracker Project

The following image shows the interfacing diagram for the day-night tracker project.

Please make the connection according to the diagram and if there is any doubt please let me know in the comment section.

Interfacing Diagram for Arduino Day-Night Tracker Project
Arduino LDR Project

Arduino Code For Day-Night Tracker Project

The below code is designed for the Arduino Day-Night Tracker Project. In this project, we are using an analog read function. This function is used to read the amount of voltage generated by the LDR.

We are storing the output of LDR in a variable and when the value of that variable is crossing the specific value then we are turning on the LED.

I have created the following type of code using my logic but if you are using different logic then you can implement it.


int sensorPin = 10;

int ledPin = 8;


void setup() 

{

Serial.begin(9600);

pinMode(sensorPin, INPUT);


}

void loop() 

{

int sensorValue = analogRead(sensorPin);

if( sensorValue <= 300 ) 

{


Serial.print("LED ON ");

Serial.println(sensorValue);

delay(100);

}


else

{

Serial.println("LED OFF");

}

}

So in this way we have learned how to make use of the analogread function. In the next section of this blog, we will learn how to design a temperature detector using LM35 and Arduino.

Arduino Temperature Detector

In this project, we are designing an Arduino temperature detector using an LM35 temperature sensor. We have already covered the basic part of this project in the above section, you can go there and check.

In this project we are reading the output of the LM35 sensor and based on the readings received from the sensor, we will turn on the LED.

Arduino Temperature detector project required components list

  • LM35
  • Arduino
  • Jumper Cables
  • Breadboard
  • Buzzer

Interfacing Diagram for Arduino Temperature Detector

The following image shows the interfacing diagram for the Arduino temperature detector project.

Please make the connection as shown in the picture and if you face any problem please let us know.

LM35 Interfacing with the arduino
Aarduino-lm35-circuit

Arduino Code For Arduino Temperature Detector

In this code below, we are reading the output of the LM35 temperature sensor and based on the readings received from the sensor, we are turning on the LED and printing those readings on the serial monitor as well.

int val;
int tempPin = A1;

void setup()
{
  Serial.begin(9600);
}
void loop()
{
  val = analogRead(tempPin);
  float mv = ( val/1024.0)*5000;
  float cel = mv/10;
  float farh = (cel*9)/5 + 32;
  Serial.print("TEMPRATURE = ");
  Serial.print(cel);
  Serial.print("*C");
  Serial.println();
  delay(1000);
/* uncomment this to get temperature in farenhite
Serial.print("TEMPRATURE = ");
Serial.print(farh);
Serial.print("*F");
Serial.println();
*/
}

Final Words - Orange Arduino Basic Kit

In this way, we learned about the different types of sensors that we are getting in this orange Arduino basic kit.

We have also done four projects using this kit. You can do some more projects using this kit.

Use your ideas and tell us in the comments section about the project you have created with the help of this kit.

Apart from this if there is any doubts then please let us know in the comment Section.


Tags : arduino , Arduino starter kit , arduino uno , Kits , sensors

Share This Article


About Robu

Robu Single Logo

India's biggest robotics E-commerce company. Robu deals with Arduino, Raspberry Pi, Sensors, Drone parts, 3D printer parts, E-bike accessories and Electronics components etc. Click here to explore range of Robotics products available at Robu. Also, do not forget to follow us on Facebook, Instagram and YouTube because we are constantly contributing to the community by creating content around Arduino, Raspberry Pi, Drones, Sensors etc.


Related Posts

card image
Raspberry Pi PoE HAT+ with New Isolated SMPS

 Saturday May 29, 2021      587 Views

A New POE HAT launched, which is almost two times powerful than the older one.... Read More

card image
The New Generation of Arduino Nano with RP2040

 Saturday May 22, 2021      789 Views

All New Arduino Nano, out with the RP2040 Chip. Focuses on Cloud applications.... Read More

card image
What is RF Transmitter and Receiver

 Friday May 22, 2020      9615 Views

In this article, we will understand, what is RF transmitter and receiver? Its features and applications.... Read More

card image
3D Printer Types Explained In Details - SLA, DMLS, FDM, SLS

 Saturday April 10, 2021      1052 Views

There are many 3D printing processes that are available in the market and can be used to design 3D objects.... Read More

Leave a comment Cancel reply

Your email address will not be published. Required fields are marked *

Search Post


Related Posts

All About ARM Architecture
How to Interface ESP8266 with Arduino
What is Raspberry Pi?
Orange Raspberry Pi Pico Starter Kit


Subscribe to our Newsletter
to get promotional offers & discounts
Robu.in | Indian Online Store | RC Hobby | Robotics
Got Questions ? Call us between 9:15 AM to 6:15 PM Monday-Saturday 1800 266 6123, 020 68197600

Information

  • Track Your Order
  • Videos
  • FAQ
  • Careers

My Account

  • Cart
  • Checkout
  • My Account
  • Payment Options

Why Choose Us?

  • Support
  • ABOUT US
  • Contact Us
  • Robu B2B

Policies

  • Investor Relations
  • MACFOS CSR
  • Privacy policy
  • Terms of Service
  • Shipping & Refund
  • E-Waste Collection
  • FAQ

Download Our App

google-play-badge
© Robu.in is registered trademark of MACFOS LIMITED - All Rights Reserved

Subscribe to our Newsletter

Information

  • Track Your Order
  • Videos
  • FAQ
  • Careers

My Account

  • Cart
  • Checkout
  • My Account
  • Payment Options

Why Choose us

  • Support
  • ABOUT US
  • Contact Us
  • Robu B2B

Policies

  • ABOUT US
  • Shipping & Refund Policy
  • Terms of Service
  • Privacy policy
  • Shipping Time / Delivery Time
  • Guarantee/Warranty
  • Changing or Canceling An Order
  • Payment Options
  • MACFOS LIMITED CSR
  • Investor Relations

Download Our App

google-play-badge
Robu.in | Indian Online Store | RC Hobby | Robotics
Got Questions ? Call us between 9:15 AM to 6:15 PM Monday-Saturday 1800 266 6123, 020 68197600