


 Sell on Robu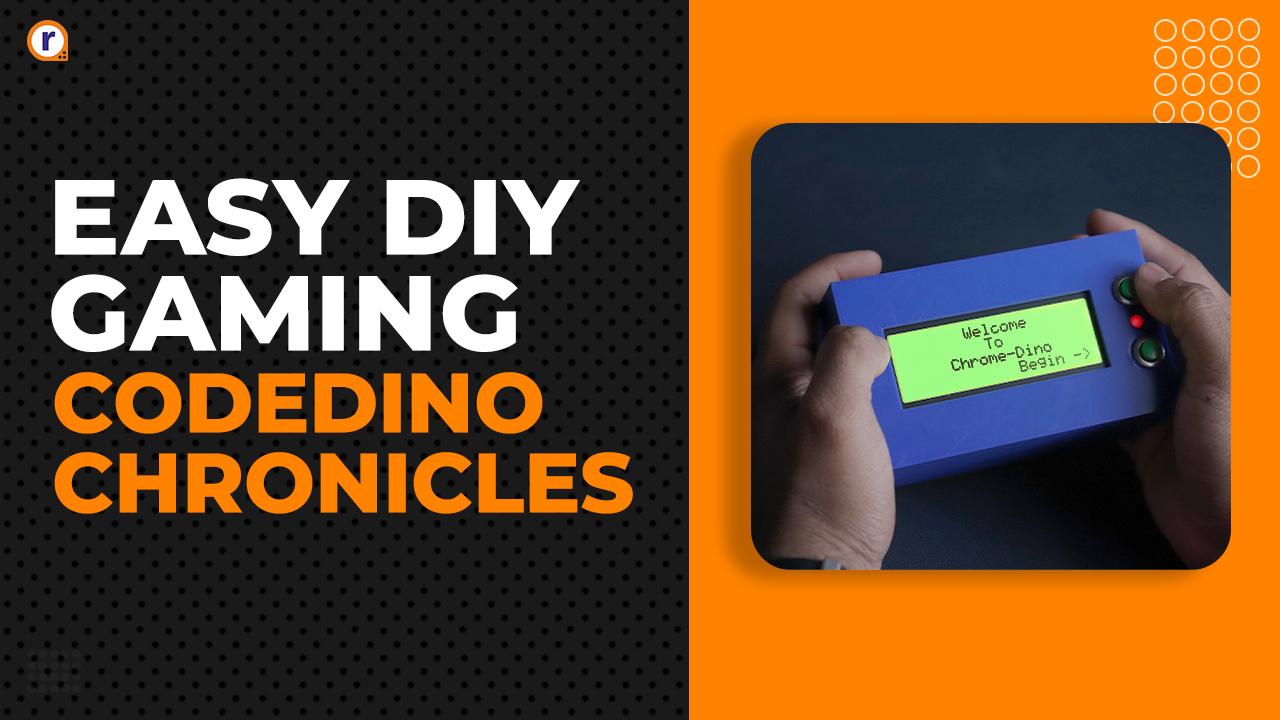


Today we're going to build an Handheld Dino Game based using Raspberry Pi Pico. Also we'll be using a 20X4 LCD Display so that we have plenty of screen space. Along with that, it'll have on board 1500mAh battery to ensure long gaming sessions.
So without any further waiting, lets get started -
What is Dino Game ?
This game was originally made as an Easter egg for chrome browser. It came when you try to visit a website and you have no internet. The dinosaur icon comes on the page, and if you were to press "spacebar" it would start running on and you'd have to time your spacebar presses to navigate over obstacles.
What is Raspberry Pi Pico ? And why ?
The Raspberry Pi Pico series is a range of tiny, fast, and versatile development boards built on RP2040, and the microcontroller chip designed by Raspberry Pi in UK.
Some of the key features of Raspberry Pi Pico -
- Dual Core ARM Cortex-M0+ processor
- 264kB RAM
- 2 × UART, 2 × SPI controllers, 2 × I2C controllers, 16 × PWM channels
- Supported input voltage 1.8–5.5V DC
- Accurate on-chip clock
- Temperature sensor (On Board)
We choose Raspberry Pi Pico, because it offer's many features like 2 of I2C, SPI, UART controllers. Which is necessary for any future upgrades like adding more modules or any peripherals.
Hardware Requirements of this Project -
- Raspberry Pi Pico
- 20X4 LCD Display with I2C module
- 1500mAh Lithium Battery
- Boost Converter
- 1A Charging Module
- Buttons
- Switch
- Led
- Buzzer
- Prototype Board
- Headers
- Jumper Cables
Software Requirements of this Project -
- Thonny IDE
- LCD libraries for Pi Pico.
Prerequisites and setting up -
Download latest Thonny IDE for your system and install it. After Thonny, open it up and connect your Pi Pico to your PC/Laptop.
Libraries / Firmware-
We gonna need the libraries for the LCD and the SD card module. So, open Thonny IDE and connect the Raspberry Pi Pico. Wait for some time for the computer to recognize the Pi Pico. After it recognizes, look at the bottom corner of the IDE for the python version, click on there and this window shall come up -
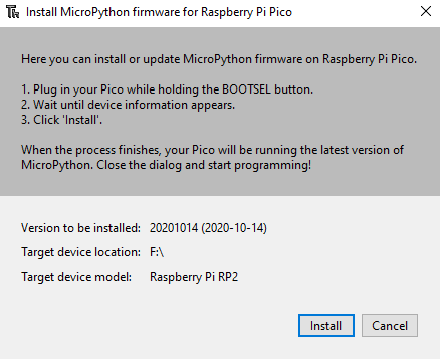
Press Install button, and wait it finishes updating the firmware and stuffs on the Raspberry Pi Pico.
Circuit Diagram and Hardware Interfacing -
Circuit Diagram -
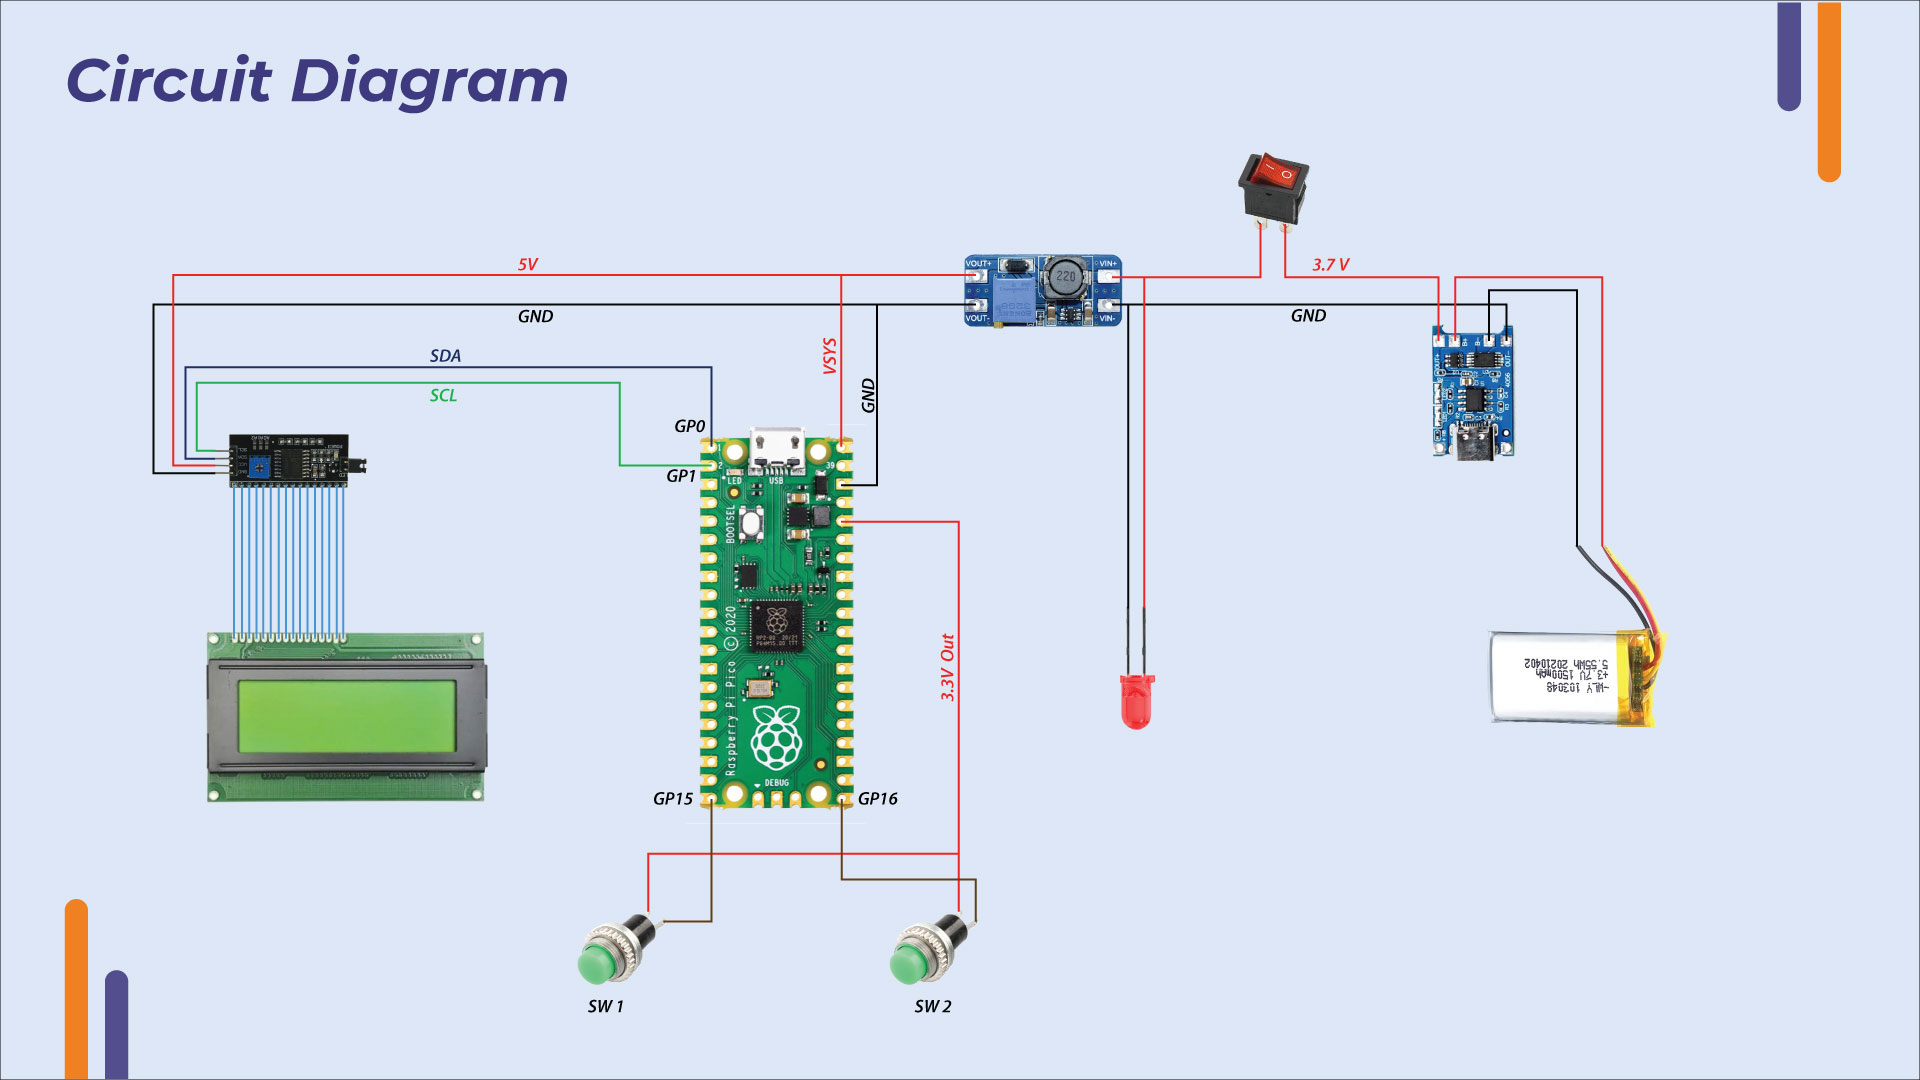
Hardware Interfacing -
|
Raspberry Pi Pico |
20X4 LCD Display |
|
+VSYS |
+5V |
|
GND |
GND |
|
GP0 |
SDA |
|
GP1 |
SCL |
|
Raspberry Pi Pico |
Buttons |
|
+3.3V |
Common |
|
GND |
- |
|
16 |
B1 |
|
15 |
B2 |
|
Raspberry Pi Pico |
Buzzer |
|
GP17 |
+3V |
|
GND |
GND |
|
Raspberry Pi Pico |
MT3608 Boost Converter |
|
+VSYS |
+VOUT |
|
GND |
-VOUT |
Coding -
Copy the following codes and save it onto Pi Pico. Before you upload the code, make sure that correct firmware is installed on Pi Pico. It should be already there with newer Pico's, but in case it didn't have the latest firmware, then you'll need to update it.
main.py -
from machine import Pin, I2C, PWM
from pico_i2c_lcd import I2cLcd
from random import randint, choice
from time import sleep

import _thread
import uasyncio

button_pin   = Pin(15, Pin.IN, Pin.PULL_DOWN)
button_pin_1 = Pin(16, Pin.IN, Pin.PULL_DOWN)

buzzer_pin = Pin(17, Pin.OUT)
buzzer_pwm = PWM(buzzer_pin, freq= 440)


i2c=I2C(0,sda=Pin(0),scl=Pin(1),freq=400000)
#print(hex(i2c.scan()[0])

lcd=I2cLcd(i2c,0x27,4,20)
lcd.backlight_on()

empty = bytearray([0b00000,0b00000,0b00000,0b00000,0b00000,0b00000,0b00000,0b00000])

rex_1 = bytearray([0b00111,0b00101,0b10111,0b10100,0b11111,0b11101,0b01100,0b01010])

rex_2 = bytearray([0b00111,0b00101,0b10111,0b10100,0b11111,0b11101,0b01100,0b10100])

cactus = [bytearray([0b00100,0b10100,0b10101,0b10101,0b01101,0b00110,0b00100,0b00100]),
          bytearray([0b00100,0b10101,0b10101,0b01101,0b00110,0b00100,0b00100,0b00100])]

flag = 0
trig = 0
count = 24
rex_pos = 3
collision = 0
speed = 0.25
score = 0


objects = []


async def obstacles():
    global cactus, objects
    while True:
        if randint(1,5) == 3 or randint(1,5) == 4:
            obj = { "cac"   : randint(0,2),
                    "pos_x" : 19,
                    "pos_y" : 3   }
            objects.append(obj)
        await uasyncio.sleep(1)


async def objects_move():
    global objects, speed
    while True:
        if len(objects) is None:
            continue
        else:
            for element in objects:
                element["pos_x"] = element["pos_x"] - 1
                if element["pos_x"] == -2:
                    objects.remove(element)
        await uasyncio.sleep(speed)


async def screen_update():
    global rex_pos, flag, count, speed, rex_1, rex_2
    while True:
        #lcd.clear()
        lcd.custom_char(2, empty)
        lcd.move_to(6,0)
        lcd.putchar(chr(2))
        lcd.move_to(8,0)
        lcd.putchar(chr(2))
        lcd.move_to(9,0)
        lcd.putchar(chr(2))
        lcd.move_to(10,0)
        lcd.putchar(chr(2))
        lcd.move_to(11,0)
        lcd.putchar(chr(2))
        lcd.move_to(12,0)
        lcd.putchar(chr(2))
        lcd.move_to(13,0)
        lcd.putchar(chr(2))
        lcd.move_to(14,0)
        lcd.putchar(chr(2))

        lcd.move_to(0,0)
        lcd.putstr("Score:"+str(score))

        if rex_pos == 3:
            if flag == 0:
                lcd.move_to(1,3)
                lcd.custom_char(1, rex_1)
                lcd.putchar(chr(1))
                flag = 1
            elif flag == 1:
                lcd.move_to(1,3)
                lcd.custom_char(1, rex_2)
                lcd.putchar(chr(1))
                flag = 0
            lcd.move_to(1,2)
            lcd.custom_char(2, empty)
            lcd.putchar(chr(2))

        if rex_pos == 2:
            if flag == 0:
                lcd.move_to(1,rex_pos)
                lcd.custom_char(1, rex_1)
                lcd.putchar(chr(1))
                flag = 1
            elif flag == 1:
                lcd.move_to(1,rex_pos)
                lcd.custom_char(1, rex_2)
                lcd.putchar(chr(1))
                flag = 0
            lcd.move_to(1,3)
            lcd.custom_char(2, empty)
            lcd.putchar(chr(2))

        for element in objects:
            lcd.move_to(element["pos_x"] + 1, element["pos_y"])
            lcd.custom_char(2, empty)
            lcd.putchar(chr(2))
            if element["pos_x"] >= 0:
                lcd.move_to(element["pos_x"], element["pos_y"])

                if element["cac"] == 0:
                    lcd.custom_char(0, cactus[0])
                    lcd.putchar(chr(0))
                else:
                    lcd.custom_char(3, cactus[1])
                    lcd.putchar(chr(3))
        await uasyncio.sleep(speed)


async def collision_check():
    global objects, collision
    while True:
        for element in objects:
            if rex_pos == 3 and element["pos_x"] == 0:
                collision = 1
        await uasyncio.sleep(speed)


async def speed_update():
    global score, speed
    while True:
        score = score + 10
        if score % 100 == 0 and speed > 0.10:
            x = score // 100
            speed = speed - 0.01 * x
        await uasyncio.sleep(1)


async def main():
    global flag, trig, rex_pos, objects, score, count, buzzer_pwm, collision

    n = 0

    lcd.clear()
    lcd.move_to(7,0)
    lcd.putstr("Welcome ")
    lcd.move_to(9,1)
    lcd.putstr("To ")
    lcd.move_to(5,2)
    lcd.putstr("Chrome-Dino")
    lcd.move_to(12,3)
    lcd.putstr("Begin ->")

    while button_pin.value() == 0:
        continue

    lcd.clear()

    task_1 = uasyncio.create_task(obstacles())
    task_2 = uasyncio.create_task(objects_move())
    task_3 = uasyncio.create_task(speed_update())
    task_4 = uasyncio.create_task(collision_check())

    task_5= uasyncio.create_task(screen_update())

    while True:
        button_state = button_pin.value()

        if button_state == 1:
            buzzer_pwm.duty_u16(512)
        elif button_state == 0:
            buzzer_pwm.duty_u16(0)

        if button_state == 1 and trig == 0:
            rex_pos = 2
            trig = 1

        elif button_state == 0 :
            rex_pos = 3
            trig = 0

        if rex_pos == 2:
            n = n + 1
            if n >= count:
                rex_pos = 3
                n = 0

        if collision == 1:
            task_1.cancel()
            task_2.cancel()
            task_3.cancel()
            task_4.cancel()
            task_5.cancel()

            score = 0
            collision = 0
            speed = 0.25
            flag = 0
            trig = 0
            objects.clear()
            buzzer_pwm.duty_u16(0)

            lcd.move_to(12,0)
            lcd.putstr("Reset ->")
            lcd.move_to(8,1)
            lcd.putstr("Game")
            lcd.move_to(8,2)
            lcd.putstr("Over")


            while button_pin_1.value() == 0:
                continue
            lcd.clear()
            task_1 = uasyncio.create_task(obstacles())
            task_2 = uasyncio.create_task(objects_move())
            task_3 = uasyncio.create_task(speed_update())
            task_4 = uasyncio.create_task(collision_check())
            task_5 = uasyncio.create_task(screen_update())


        await uasyncio.sleep(0.05)


uasyncio.run(main())
lcd_api.py -
import time

class LcdApi:

    # Implements the API for talking with HD44780 compatible character LCDs.
    # This class only knows what commands to send to the LCD, and not how to get
    # them to the LCD.
    #
    # It is expected that a derived class will implement the hal_xxx functions.
    #
    # The following constant names were lifted from the avrlib lcd.h header file,
    # with bit numbers changed to bit masks.

    # HD44780 LCD controller command set
    LCD_CLR             = 0x01  # DB0: clear display
    LCD_HOME            = 0x02  # DB1: return to home position

    LCD_ENTRY_MODE      = 0x04  # DB2: set entry mode
    LCD_ENTRY_INC       = 0x02  # DB1: increment
    LCD_ENTRY_SHIFT     = 0x01  # DB0: shift

    LCD_ON_CTRL         = 0x08  # DB3: turn lcd/cursor on
    LCD_ON_DISPLAY      = 0x04  # DB2: turn display on
    LCD_ON_CURSOR       = 0x02  # DB1: turn cursor on
    LCD_ON_BLINK        = 0x01  # DB0: blinking cursor

    LCD_MOVE            = 0x10  # DB4: move cursor/display
    LCD_MOVE_DISP       = 0x08  # DB3: move display (0-> move cursor)
    LCD_MOVE_RIGHT      = 0x04  # DB2: move right (0-> left)

    LCD_FUNCTION        = 0x20  # DB5: function set
    LCD_FUNCTION_8BIT   = 0x10  # DB4: set 8BIT mode (0->4BIT mode)
    LCD_FUNCTION_2LINES = 0x08  # DB3: two lines (0->one line)
    LCD_FUNCTION_10DOTS = 0x04  # DB2: 5x10 font (0->5x7 font)
    LCD_FUNCTION_RESET  = 0x30  # See "Initializing by Instruction" section

    LCD_CGRAM           = 0x40  # DB6: set CG RAM address
    LCD_DDRAM           = 0x80  # DB7: set DD RAM address

    LCD_RS_CMD          = 0
    LCD_RS_DATA         = 1

    LCD_RW_WRITE        = 0
    LCD_RW_READ         = 1

    def __init__(self, num_lines, num_columns):
        self.num_lines = num_lines
        if self.num_lines > 4:
            self.num_lines = 4
        self.num_columns = num_columns
        if self.num_columns > 40:
            self.num_columns = 40
        self.cursor_x = 0
        self.cursor_y = 0
        self.implied_newline = False
        self.backlight = True
        self.display_off()
        self.backlight_on()
        self.clear()
        self.hal_write_command(self.LCD_ENTRY_MODE | self.LCD_ENTRY_INC)
        self.hide_cursor()
        self.display_on()

    def clear(self):
        # Clears the LCD display and moves the cursor to the top left corner
        self.hal_write_command(self.LCD_CLR)
        self.hal_write_command(self.LCD_HOME)
        self.cursor_x = 0
        self.cursor_y = 0

    def show_cursor(self):
        # Causes the cursor to be made visible
        self.hal_write_command(self.LCD_ON_CTRL | self.LCD_ON_DISPLAY |
                               self.LCD_ON_CURSOR)

    def hide_cursor(self):
        # Causes the cursor to be hidden
        self.hal_write_command(self.LCD_ON_CTRL | self.LCD_ON_DISPLAY)

    def blink_cursor_on(self):
        # Turns on the cursor, and makes it blink
        self.hal_write_command(self.LCD_ON_CTRL | self.LCD_ON_DISPLAY |
                               self.LCD_ON_CURSOR | self.LCD_ON_BLINK)

    def blink_cursor_off(self):
        # Turns on the cursor, and makes it no blink (i.e. be solid)
        self.hal_write_command(self.LCD_ON_CTRL | self.LCD_ON_DISPLAY |
                               self.LCD_ON_CURSOR)

    def display_on(self):
        # Turns on (i.e. unblanks) the LCD
        self.hal_write_command(self.LCD_ON_CTRL | self.LCD_ON_DISPLAY)

    def display_off(self):
        # Turns off (i.e. blanks) the LCD
        self.hal_write_command(self.LCD_ON_CTRL)

    def backlight_on(self):
        # Turns the backlight on.

        # This isn't really an LCD command, but some modules have backlight
        # controls, so this allows the hal to pass through the command.
        self.backlight = True
        self.hal_backlight_on()

    def backlight_off(self):
        # Turns the backlight off.

        # This isn't really an LCD command, but some modules have backlight
        # controls, so this allows the hal to pass through the command.
        self.backlight = False
        self.hal_backlight_off()

    def move_to(self, cursor_x, cursor_y):
        # Moves the cursor position to the indicated position. The cursor
        # position is zero based (i.e. cursor_x == 0 indicates first column).
        self.cursor_x = cursor_x
        self.cursor_y = cursor_y
        addr = cursor_x & 0x3f
        if cursor_y & 1:
            addr += 0x40    # Lines 1 & 3 add 0x40
        if cursor_y & 2:    # Lines 2 & 3 add number of columns
            addr += self.num_columns
        self.hal_write_command(self.LCD_DDRAM | addr)

    def putchar(self, char):
        # Writes the indicated character to the LCD at the current cursor
        # position, and advances the cursor by one position.
        if char == '\n':
            if self.implied_newline:
                # self.implied_newline means we advanced due to a wraparound,
                # so if we get a newline right after that we ignore it.
                pass
            else:
                self.cursor_x = self.num_columns
        else:
            self.hal_write_data(ord(char))
            self.cursor_x += 1
        if self.cursor_x >= self.num_columns:
            self.cursor_x = 0
            self.cursor_y += 1
            self.implied_newline = (char != '\n')
        if self.cursor_y >= self.num_lines:
            self.cursor_y = 0
        self.move_to(self.cursor_x, self.cursor_y)

    def putstr(self, string):
        # Write the indicated string to the LCD at the current cursor
        # position and advances the cursor position appropriately.
        for char in string:
            self.putchar(char)

    def custom_char(self, location, charmap):
        # Write a character to one of the 8 CGRAM locations, available
        # as chr(0) through chr(7).
        location &= 0x7
        self.hal_write_command(self.LCD_CGRAM | (location << 3))
        self.hal_sleep_us(40)
        for i in range(8):
            self.hal_write_data(charmap[i])
            self.hal_sleep_us(40)
        self.move_to(self.cursor_x, self.cursor_y)

    def hal_backlight_on(self):
        # Allows the hal layer to turn the backlight on.
        # If desired, a derived HAL class will implement this function.
        pass

    def hal_backlight_off(self):
        # Allows the hal layer to turn the backlight off.
        # If desired, a derived HAL class will implement this function.
        pass

    def hal_write_command(self, cmd):
        # Write a command to the LCD.
        # It is expected that a derived HAL class will implement this function.
        raise NotImplementedError

    def hal_write_data(self, data):
        # Write data to the LCD.
        # It is expected that a derived HAL class will implement this function.
        raise NotImplementedError

    def hal_sleep_us(self, usecs):
        # Sleep for some time (given in microseconds)
        time.sleep_us(usecs)
pico_12c_lcd.py -
import utime
import gc

from lcd_api import LcdApi
from machine import I2C

# PCF8574 pin definitions
MASK_RS = 0x01       # P0
MASK_RW = 0x02       # P1
MASK_E  = 0x04       # P2

SHIFT_BACKLIGHT = 3  # P3
SHIFT_DATA      = 4  # P4-P7

class I2cLcd(LcdApi):

    #Implements a HD44780 character LCD connected via PCF8574 on I2C

    def __init__(self, i2c, i2c_addr, num_lines, num_columns):
        self.i2c = i2c
        self.i2c_addr = i2c_addr
        self.i2c.writeto(self.i2c_addr, bytes([0]))
        utime.sleep_ms(20)   # Allow LCD time to powerup
        # Send reset 3 times
        self.hal_write_init_nibble(self.LCD_FUNCTION_RESET)
        utime.sleep_ms(5)    # Need to delay at least 4.1 msec
        self.hal_write_init_nibble(self.LCD_FUNCTION_RESET)
        utime.sleep_ms(1)
        self.hal_write_init_nibble(self.LCD_FUNCTION_RESET)
        utime.sleep_ms(1)
        # Put LCD into 4-bit mode
        self.hal_write_init_nibble(self.LCD_FUNCTION)
        utime.sleep_ms(1)
        LcdApi.__init__(self, num_lines, num_columns)
        cmd = self.LCD_FUNCTION
        if num_lines > 1:
            cmd |= self.LCD_FUNCTION_2LINES
        self.hal_write_command(cmd)
        gc.collect()

    def hal_write_init_nibble(self, nibble):
        # Writes an initialization nibble to the LCD.
        # This particular function is only used during initialization.
        byte = ((nibble >> 4) & 0x0f) << SHIFT_DATA
        self.i2c.writeto(self.i2c_addr, bytes([byte | MASK_E]))
        self.i2c.writeto(self.i2c_addr, bytes([byte]))
        gc.collect()

    def hal_backlight_on(self):
        # Allows the hal layer to turn the backlight on
        self.i2c.writeto(self.i2c_addr, bytes([1 << SHIFT_BACKLIGHT]))
        gc.collect()

    def hal_backlight_off(self):
        #Allows the hal layer to turn the backlight off
        self.i2c.writeto(self.i2c_addr, bytes([0]))
        gc.collect()

    def hal_write_command(self, cmd):
        # Write a command to the LCD. Data is latched on the falling edge of E.
        byte = ((self.backlight << SHIFT_BACKLIGHT) |
                (((cmd >> 4) & 0x0f) << SHIFT_DATA))
        self.i2c.writeto(self.i2c_addr, bytes([byte | MASK_E]))
        self.i2c.writeto(self.i2c_addr, bytes([byte]))
        byte = ((self.backlight << SHIFT_BACKLIGHT) |
                ((cmd & 0x0f) << SHIFT_DATA))
        self.i2c.writeto(self.i2c_addr, bytes([byte | MASK_E]))
        self.i2c.writeto(self.i2c_addr, bytes([byte]))
        if cmd <= 3:
            # The home and clear commands require a worst case delay of 4.1 msec
            utime.sleep_ms(5)
        gc.collect()

    def hal_write_data(self, data):
        # Write data to the LCD. Data is latched on the falling edge of E.
        byte = (MASK_RS |
                (self.backlight << SHIFT_BACKLIGHT) |
                (((data >> 4) & 0x0f) << SHIFT_DATA))
        self.i2c.writeto(self.i2c_addr, bytes([byte | MASK_E]))
        self.i2c.writeto(self.i2c_addr, bytes([byte]))
        byte = (MASK_RS |
                (self.backlight << SHIFT_BACKLIGHT) |
                ((data & 0x0f) << SHIFT_DATA))
        self.i2c.writeto(self.i2c_addr, bytes([byte | MASK_E]))
        self.i2c.writeto(self.i2c_addr, bytes([byte]))
        gc.collect()
Working of Project -
The working of this project is pretty easy to understand. When we power on the device, it initializes the LCD module first and waits for the user input to start the routine's which will help in the functioning of the game.
There are few key components of this game, like collision check, adding of obstacles on the stack, moving the obstacles on each cycle, changing the dinosaurs image to make it look like its running, and a few more quality of life add-ons.
And if you were to crash the dino onto the cactus, it'll be "Game Over" and you'll be needing to press the reset button to reset everything and start from the beginning.
Conclusion -
If up to this point, there's no error which has occurred then you have a working Dino Game. Which you can play whenever you want to. And with added charging module it can be easily charged without the need to open it and swapping the battery. And the entire project is encased within a 3D printed box for easy use and protection of the internal parts.
And also, the box is based around 20X4 LCD, so it can be used for other projects revolving around that LCD display.




Leave a Comment Your email address will not be published. Required fields are marked*