


 Sell on Robu


This guide takes you through the SP racing F3 flight controller setup in the cleanflight, step-by-step. We will cover everything from installing the cleanflight GUI software to setting up flight modes for your quadcopter.
Don’t worry, the configuration process is not as complex as it sounds, assuming you follow the steps in this guide.
What is the SP Racing F3 Flight controller?
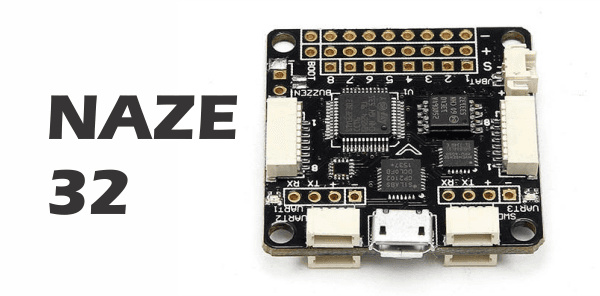
Racing F3 Flight Controller (SP Racing F3) was designed to give awesome flight performance. The SP Racing F3 gives you all the features you need for the heart of your aircraft, whether you’re into FPV racing, acrobatic flying or aerial photography its perfect.
SP Racing F3 Versions:
- There are two versions are available in SP Racing flight controller.
Both the versions use the same basic hardware such as the STM32F303 CPU model.
Parameters |
SP Racing F3 Acro version |
SP Racing F3 Deluxe version |
| CPU model | STM32F303 | STM32F303 |
| Main MPU | MPU6050 | MPU6050 |
| Barometer | No | MS5611 |
| Compass | NO | HMC5883 |
| PWM outputs | 8 | 8 |
| No. of UARTs | 3 | 3 |
| RSSI analog input | Yes | Yes |
| I2C input | Yes | Yes |
| Buzzer output | Yes | Yes |
| VBAT input | Yes-up to 4S (17v) | Yes- up to 4S (17v) |
| LED strip output | Yes | Yes |
| Current sensor analog input | Yes | Yes |
SP Racing F3 pinouts
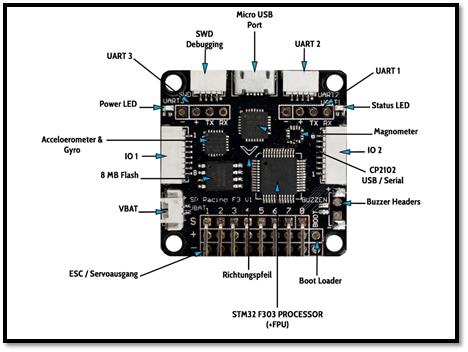
Below figure shows the pinout diagram of SP racing F3 flight controller. It includes accelerometer, gyro sensor, magnetometer etc.
SP Racing connection diagram:
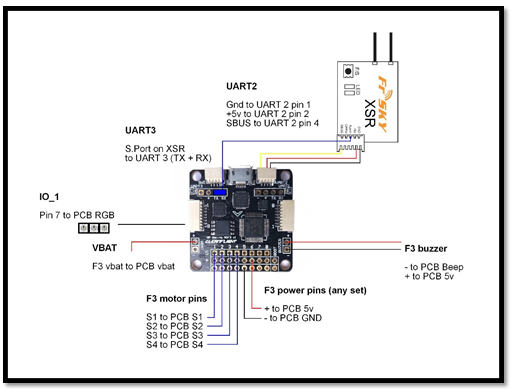
Below is the connection diagram of Sp racing f3 flight controller.
SP Racing Firmware
The SP Racing boards can run either base flight or clean flight firmware. Both are very similar but clean flight Firmware is more updated. Kindly go through the below link and install this software.
Link: https://chrome.google.com/webstore/search/cleanflight?hl=en
After installation of the software, kindly connect your flight controller to the PC and select the com port. Then select the latest firmware and click on the Load Firmware (Online) button at the bottom of the screen and Clean flight will download the firmware onto your PC. Once done, you will see that the ‘Flash Firmware’ button. After that, we first need to enable the bootloader mode.
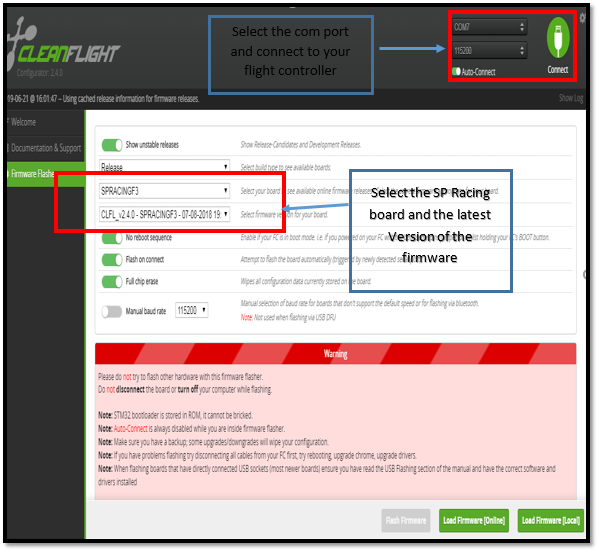
Bootloader mode allows to flash firmware onto the flight controller board. The process of enabling bootloader mode is very simple. You need to do is short the two bootloader pins (as shown below) as you connect the flight controller to your PC.

Now that the board is connected to the PC in bootloader mode, you simply have to click the Flash Firmware button.
If this works straight away, then great!
This isn’t usually the case however. You usually need to change a few settings. This is the process I follow:
- Go back up the page and turn on ‘Flash on Connect’ (first select ‘No reboot sequence’) and ‘Full Chip Erase’ for good measure.
- Unplug the board and connect it again (still in bootloader mode). Clean flight will then attempt to flash the firmware automatically upon connection.
- Didn’t work again? Hit ‘Flash Firmware’ again just to make sure.
- Last but not least, if you’ve been through all of this, unplug the board again and select ‘Manual Baud Rate’ (whilst keeping the other options selected). You might also want to try a slower baud rate just to make triple sure.
- Plug the board in again and hey presto! Hopefully, the firmware is being flashed.
- If you are still having problems, make a quick video of what you are doing and post it on our forums and one of us will help you out!
Calibration of Accelerometer and Compass:
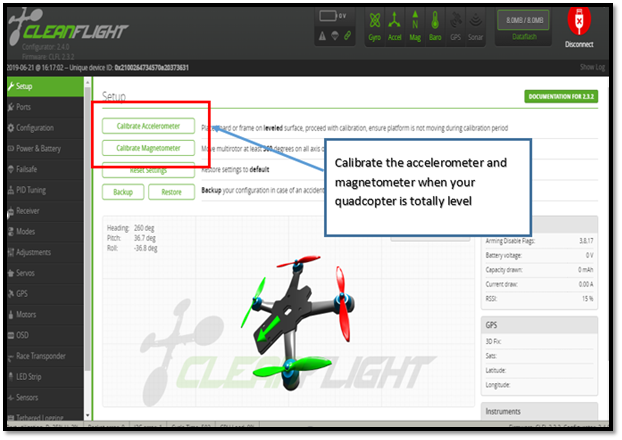
The sensitive IMU units might, therefore, need a re-calibration. Fortunately, this is super easy, as it’s just the click of a button within cleanflight. Simple connect to your board via cleanflight and on the Setup Tab, you will see the Calibrate Accelerometer button.
Before pressing this button, simply place your quad copter on a surface you know is level (thereby ensuring the flight controller itself is level) and make sure that there are no vibrations or micro movements. Then simply click the calibrate Accelerometer button on the Setup Tab.
Setting up your Radio:
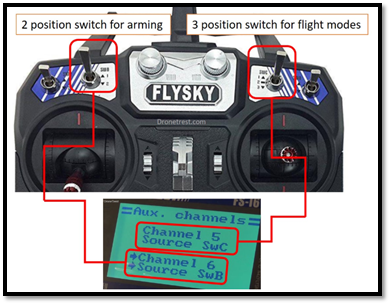
When you are setting up your clean flight board, do the radio settings correctly. This means to make sure that the channels are correctly assigned and not reversed. Also keep the range is between 1000-2000
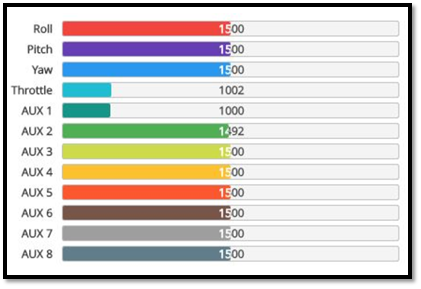
On the above tab, you will see a bunch of bars that represent the inputs from your radio. When you move a stick on the radio, the corresponding bar should move on screen.
You may find that when you move a stick on the radio, a channel that doesn't correspond to that stick moves on screen. You will need to correct this and this is done by changing the channel mapping.
Hope this article helps you to configure your SP racing flight controller with cleanflight. You can also use another software like beta flight to configure this.
We at Robu.in hope that you found it interesting and that you will come back for more of our educational blogs.




Devender
Thursday, May 7, 2020