


 Sell on Robu


Table of Contents
- What is a fingerprint sensor?
- Why use a fingerprint sensor?
- What is an optical fingerprint sensor?
- Advantages
- Where are optical fingerprint sensors used?
- How to interface
- Hardware requirement
- Software requirement
- Circuit diagram
- Assembly
- Working
- Code
- Conclusion
What is a fingerprint sensor?
A fingerprint sensor captures an image of a person's fingerprint and compares it to a database of known fingerprints. If the fingerprint matches one in the database, the individual's identity is verified. Fingerprint sensors are used in many devices, such as laptops, tablets, and smartphones.Why use a fingerprint sensor?
The primary reason to use a fingerprint sensor is biometric authentication, which provides increased protection. Fingerprints are nearly impossible to replicate, making them a highly secure form of identification, ideal for keeping sensitive data protected.What is an optical fingerprint sensor?
An optical fingerprint sensor uses optical imaging technology to digitize and capture a person's fingerprint image.Advantages
The primary benefits of optical fingerprint sensors are their affordability compared to other biometric authentication methods, ease of integration into devices, and compatibility with cases and screen protectors.Where are optical fingerprint sensors used?
Optical fingerprint sensors have a wide range of applications, including attendance tracking, access control, biometric security, and more.How to interface
We will build a simple access control system by interfacing an optical fingerprint sensor and a servo motor with an Arduino Nano.Hardware requirement
Software requirement
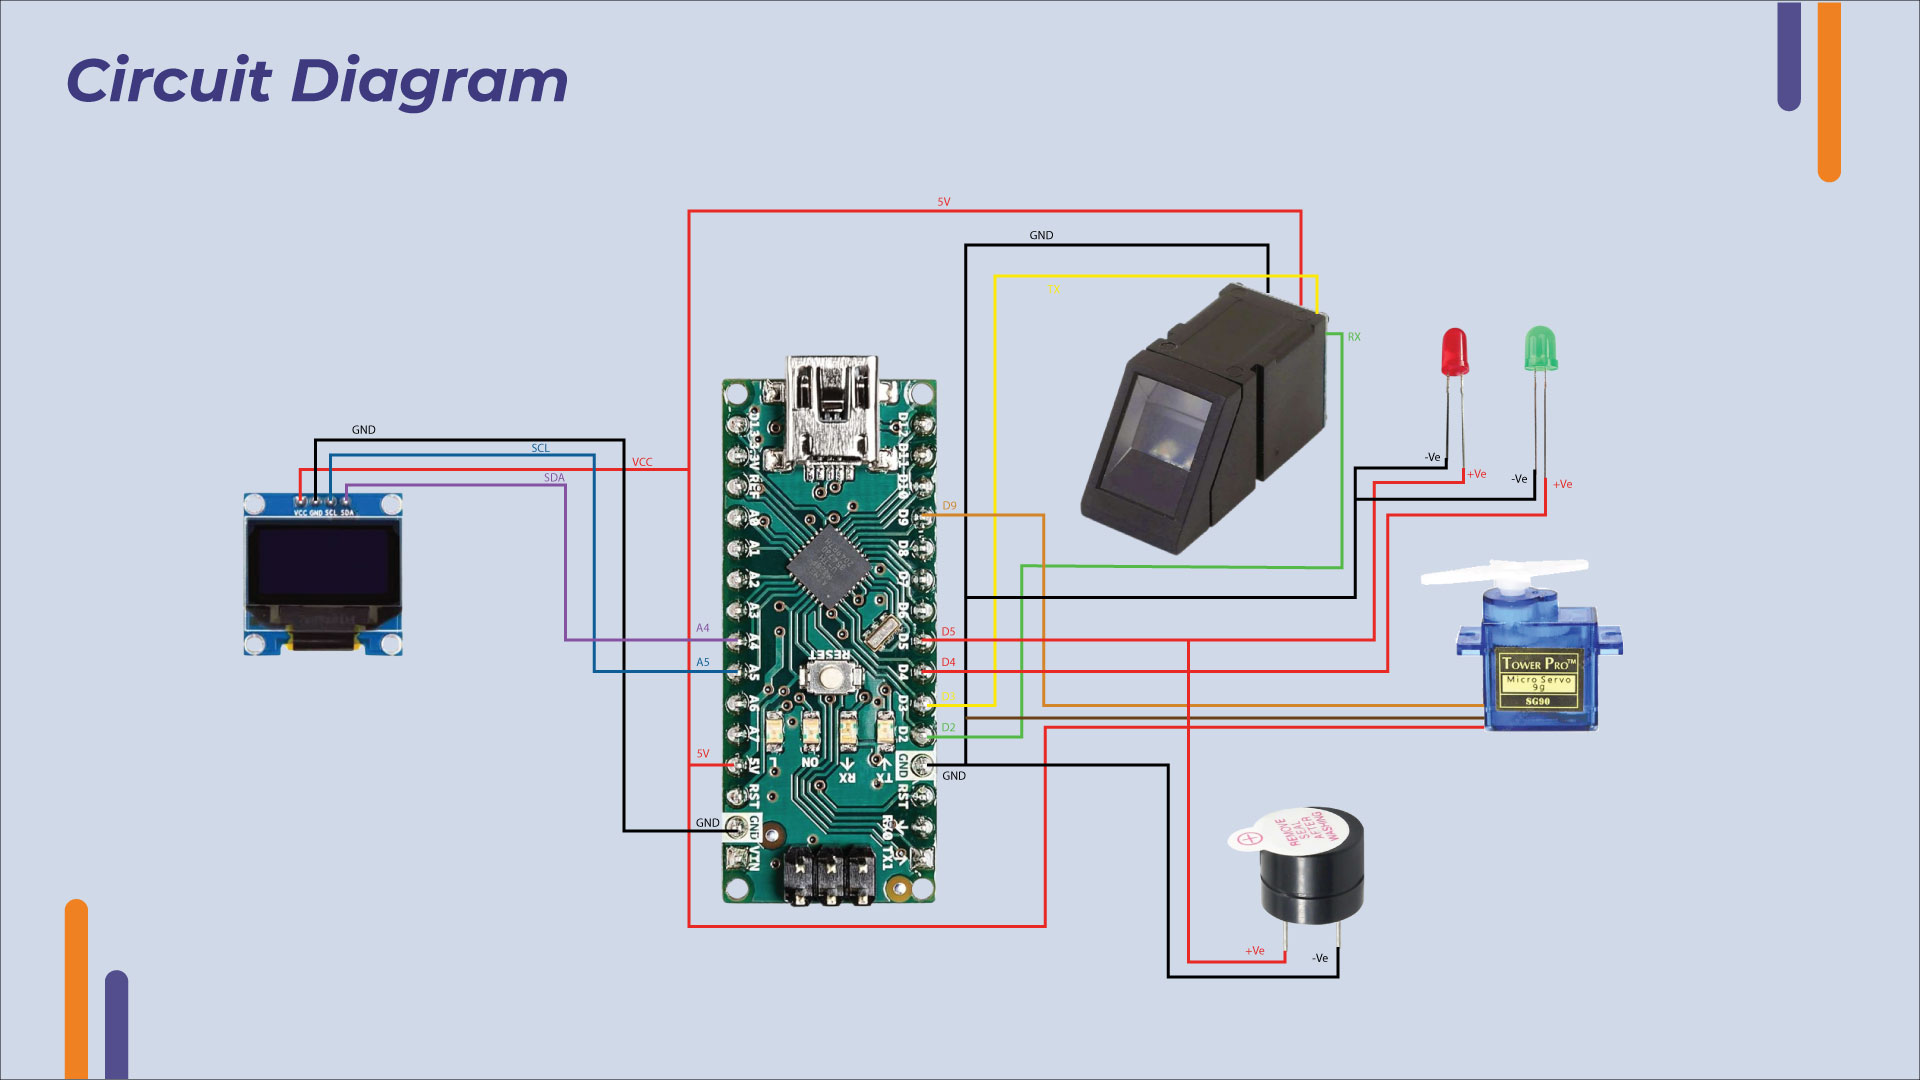
Circuit diagram
Assembly
Optical fingerprint sensor with Arduino Nano
| Optical Sensor Wire | Arduino Nano Pin |
| Black wire | GND |
| Red wire | 5V |
| Yellow wire | Pin D3 |
| Green wire | Pin D2 |
Interface OLED display with Arduino using I2C Pins
| OLED Pin | Arduino Nano Pin |
| SDA | A4/SDA |
| SCL | A5/SCL |
| VCC | 5V |
| GND | GND |
Servo with Arduino Nano
| Servo Wire | Arduino Nano Pin |
| Red wire | 5V |
| Brown wire | GND |
| Orange wire | Pin D9 |
Working
- After assembling the components, open the Arduino IDE.
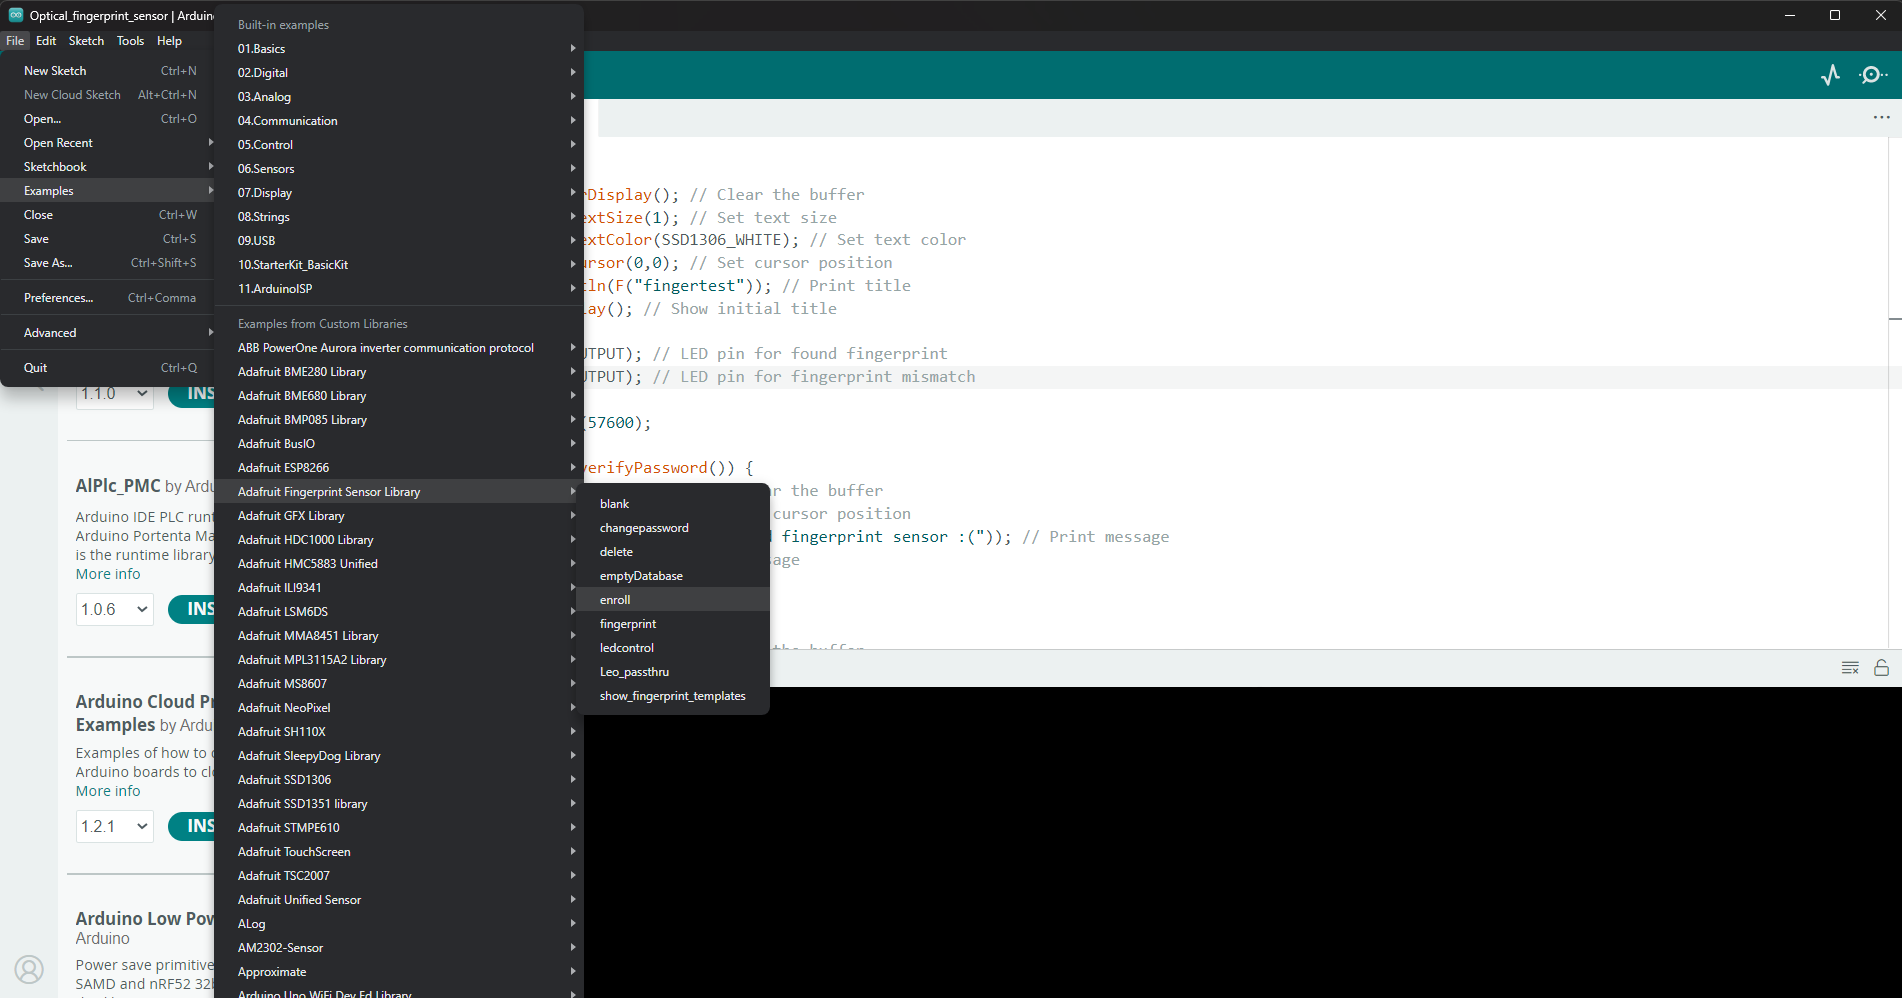
- Upload the enroll example code from the Adafruit fingerprint sensor library.
- Place your finger on the sensor to register the fingerprint and assign an ID to it.
- Upload the main access control code.
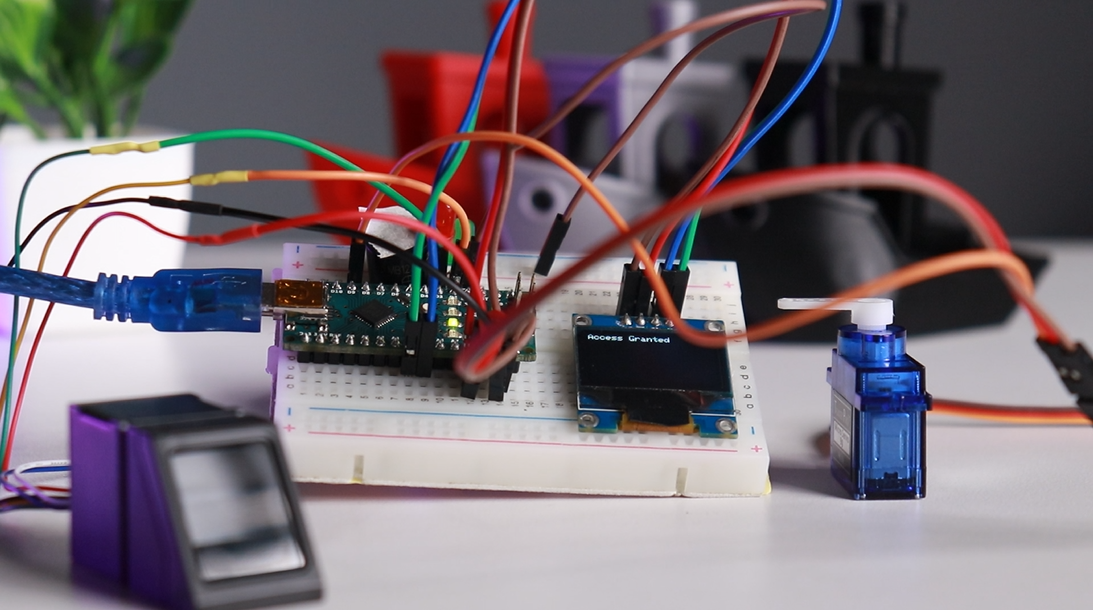
- When a registered finger is placed on the sensor, the green LED turns on, the servo motor activates, and access is granted.
- If an unregistered finger is placed on the sensor, the red LED turns on, the buzzer sounds, and access is denied.
Code
Enroll code
Access control code
#include <Adafruit_Fingerprint.h>
#include <Wire.h>
#include <Adafruit_GFX.h>
#include <Adafruit_SSD1306.h>
#include <Servo.h> // Include the Servo library
#define SCREEN_WIDTH 128 // OLED display width, in pixels
#define SCREEN_HEIGHT 64 // OLED display height, in pixels
#define OLED_RESET -1 // Reset pin # (or -1 if sharing Arduino reset pin)
Adafruit_SSD1306 display(SCREEN_WIDTH, SCREEN_HEIGHT, &Wire, OLED_RESET); // Use hardware I2C for OLED
SoftwareSerial mySerial(2, 3);
Adafruit_Fingerprint finger = Adafruit_Fingerprint(&mySerial);
Servo servo; // Define servo object
const char accessGranted[] PROGMEM = "Access Granted";
const char accessDenied[] PROGMEM = "Access Denied";
void setup() {
Serial.begin(9600);
while (!Serial); // Wait for serial port to connect
servo.attach(9); // Attach servo to pin 9
if (!display.begin(SSD1306_SWITCHCAPVCC, 0x3C)) { // Address 0x3C for 128x64
Serial.println(F("SSD1306 allocation failed"));
while (true);
}
display.clearDisplay(); // Clear the buffer
display.setTextSize(1); // Set text size
display.setTextColor(SSD1306_WHITE); // Set text color
display.setCursor(0,0); // Set cursor position
display.println(F("fingertest")); // Print title
display.display(); // Show initial title
pinMode(4, OUTPUT); // LED pin for found fingerprint
pinMode(5, OUTPUT); // LED pin for fingerprint mismatch
finger.begin(57600);
if (!finger.verifyPassword()) {
display.clearDisplay(); // Clear the buffer
display.setCursor(0,0); // Set cursor position
display.println(F("Did not find fingerprint sensor :(")); // Print message
display.display(); // Show message
while (true);
}
display.clearDisplay(); // Clear the buffer
display.setCursor(0,0); // Set cursor position
display.println(F("Found fingerprint sensor!")); // Print message
display.display(); // Show message
finger.getTemplateCount();
Serial.print(F("Sensor contains ")); Serial.print(finger.templateCount); Serial.println(F(" templates"));
Serial.println(F("Waiting for valid finger..."));
}
void loop() {
int result = getFingerprintIDez();
digitalWrite(4, LOW);
display.clearDisplay(); // Clear the buffer
display.setCursor(0,0); // Set cursor position
if (result != -1) {
if (result == 1) {
display.println(F("Access Granted")); // Print message
servo.write(90); // Rotate servo to 90 degrees
delay(3000); // Keep servo at 90 degrees for 3 seconds
servo.write(0); // Return servo to 0 degrees
} else {
display.println(F("Access Denied")); // Print message
}
display.display(); // Show message
delay(3000); // Display message for 3 seconds
}
}
int getFingerprintIDez() {
uint8_t p = finger.getImage();
if (p != FINGERPRINT_OK) {
return -1;
}
p = finger.image2Tz();
if (p != FINGERPRINT_OK) {
return -1;
}
p = finger.fingerFastSearch();
if (p != FINGERPRINT_OK) {
digitalWrite(5, HIGH); // Turn on LED for fingerprint mismatch
delay(3000); // Wait for 3 seconds
digitalWrite(5, LOW); // Turn off LED for fingerprint mismatch
return 0;
}
digitalWrite(4, HIGH); // Turn on LED for found fingerprint
delay(3000); // Wait for 3 seconds
digitalWrite(4, LOW); // Turn off LED for found fingerprint
Serial.print(F("Found ID #")); Serial.print(finger.fingerID);
Serial.print(F(" with confidence of ")); Serial.println(finger.confidence);
return 1;
}
Conclusion.
In this project, we successfully interfaced an optical fingerprint sensor with an Arduino Nano to create a simple yet effective access control system. This system demonstrates the practicality and security of using biometric authentication for access control. By following the detailed steps provided, including the hardware assembly, software setup, and coding, we achieved a working model that grants access to registered users while denying entry to unregistered individuals. The project highlights the advantages of optical fingerprint sensors, such as affordability, ease of integration, and reliability. Additionally, it showcases the versatility of Arduino for implementing biometric security solutions. This access control system can be further enhanced and customized for various applications, such as securing doors, safes, or any restricted area, proving the value of integrating biometric technology into everyday security systems.Watch video on You tube - https://youtu.be/fXG4rLMNsywRelated blog - https://robu.in/interfacing-fingerprint-sensor-with-arduino-complete-guide/




Leave a Comment Your email address will not be published. Required fields are marked*